

Bullet Middleware Integration
The first step I took to integrate the Bullet Physics middleware with our NCL framework (provided by Newcastle University) was to include its library as a submodule in CMake.
With that done, I included the header in the file.
TutorialGame.h:
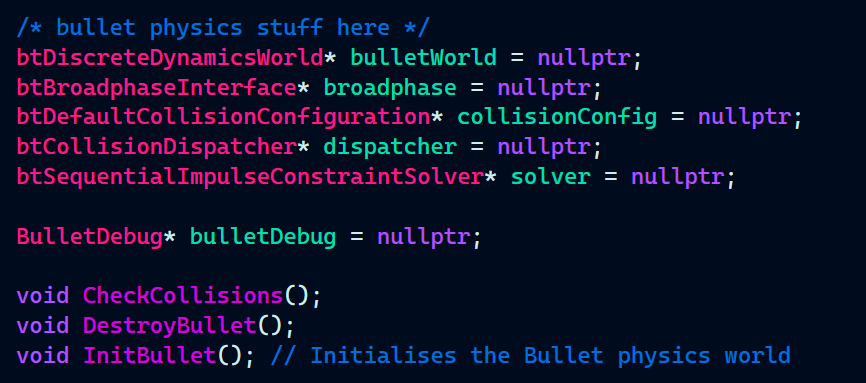
![]()
I defined the essential Bullet physics components required to initialize the physics simulation for the game objects. Also, defined some functions to initialize bullet components, destroy bullet components, and check for collisions.
Next, I initialized the components, set the gravity, as well as initialized a debug interface for the shape of the colliders (debug interface created by Kieran Knowles).
TutorialGame.cpp:

Following the InitBullet() method where I initialized all the bullet physics component, It was also important to clear all the components in order to prevent any memory leaks which has the done in the DestroyBullet method():
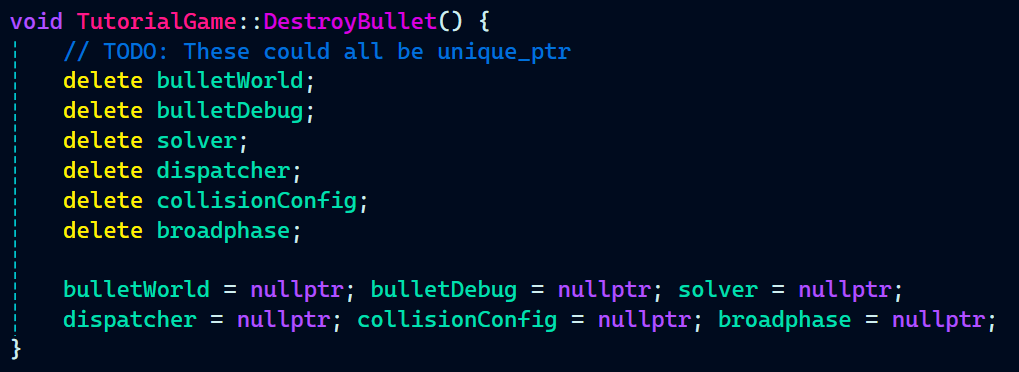
Just destroying bullet components does not remove the rigidbodies from the game objects. This has been done in the clearGraveyard() method:
![]()
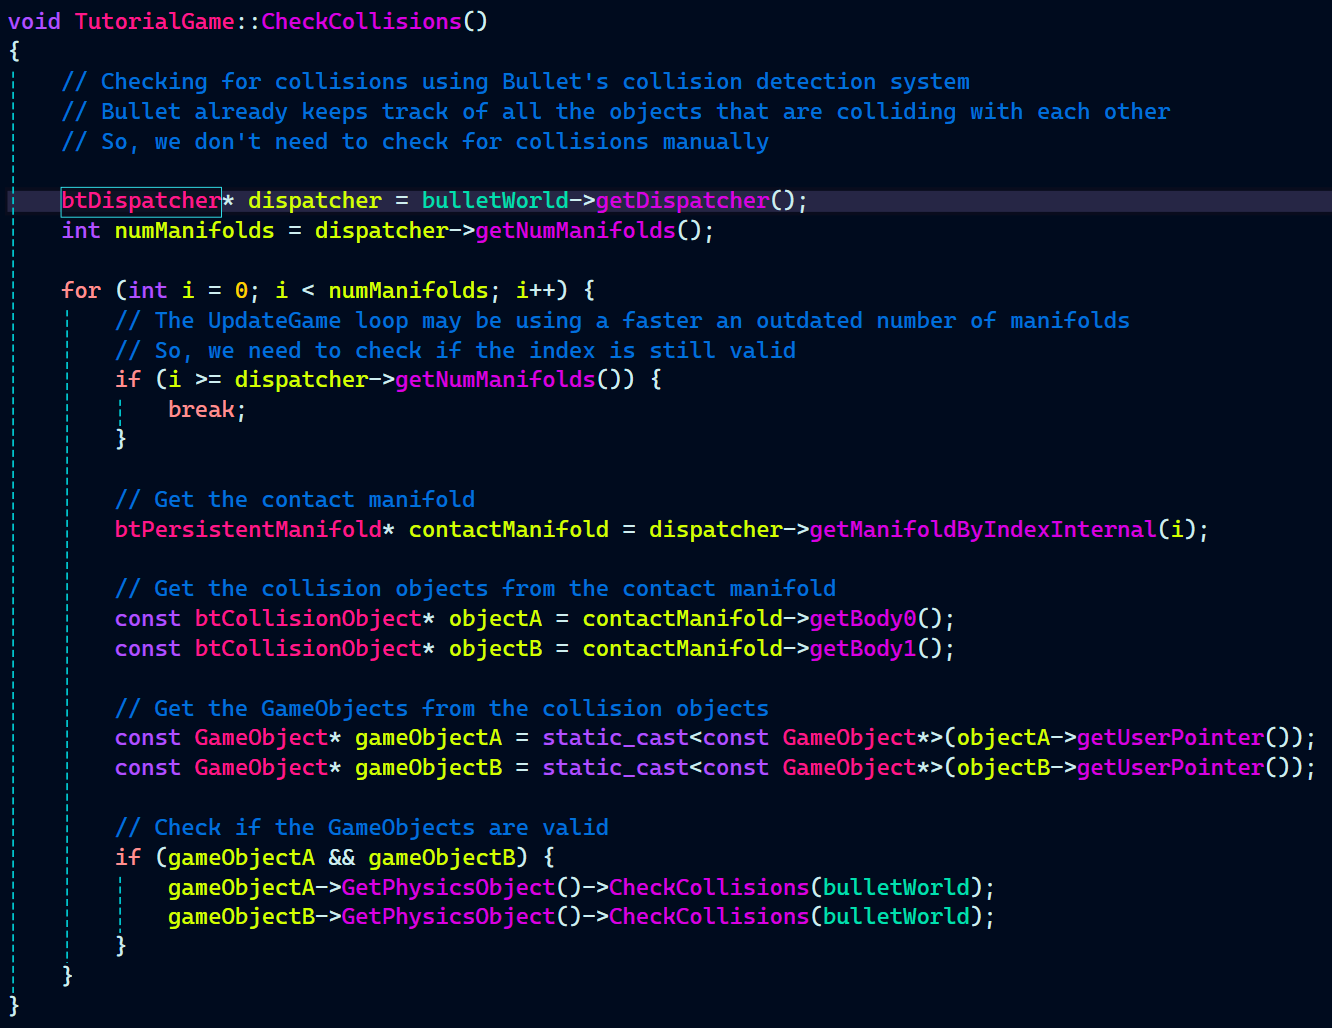
I implemented a function to check for collisions between game objects with rigidbodies. The CheckCollisions() method is quite fast as it uses bullet’s internal collision detection system. Earlier when I was manually checking for collisions between each game object it took somewhere near 7-8 ms. But, after implementing this new system for collision detection it only takes 0.7-0.8 ms.
As we followed Object-Oriented design for our custom game engine, I implemented everything related to physics in it’s own class called PhysicsObject.h and PhysicsObject.cpp.
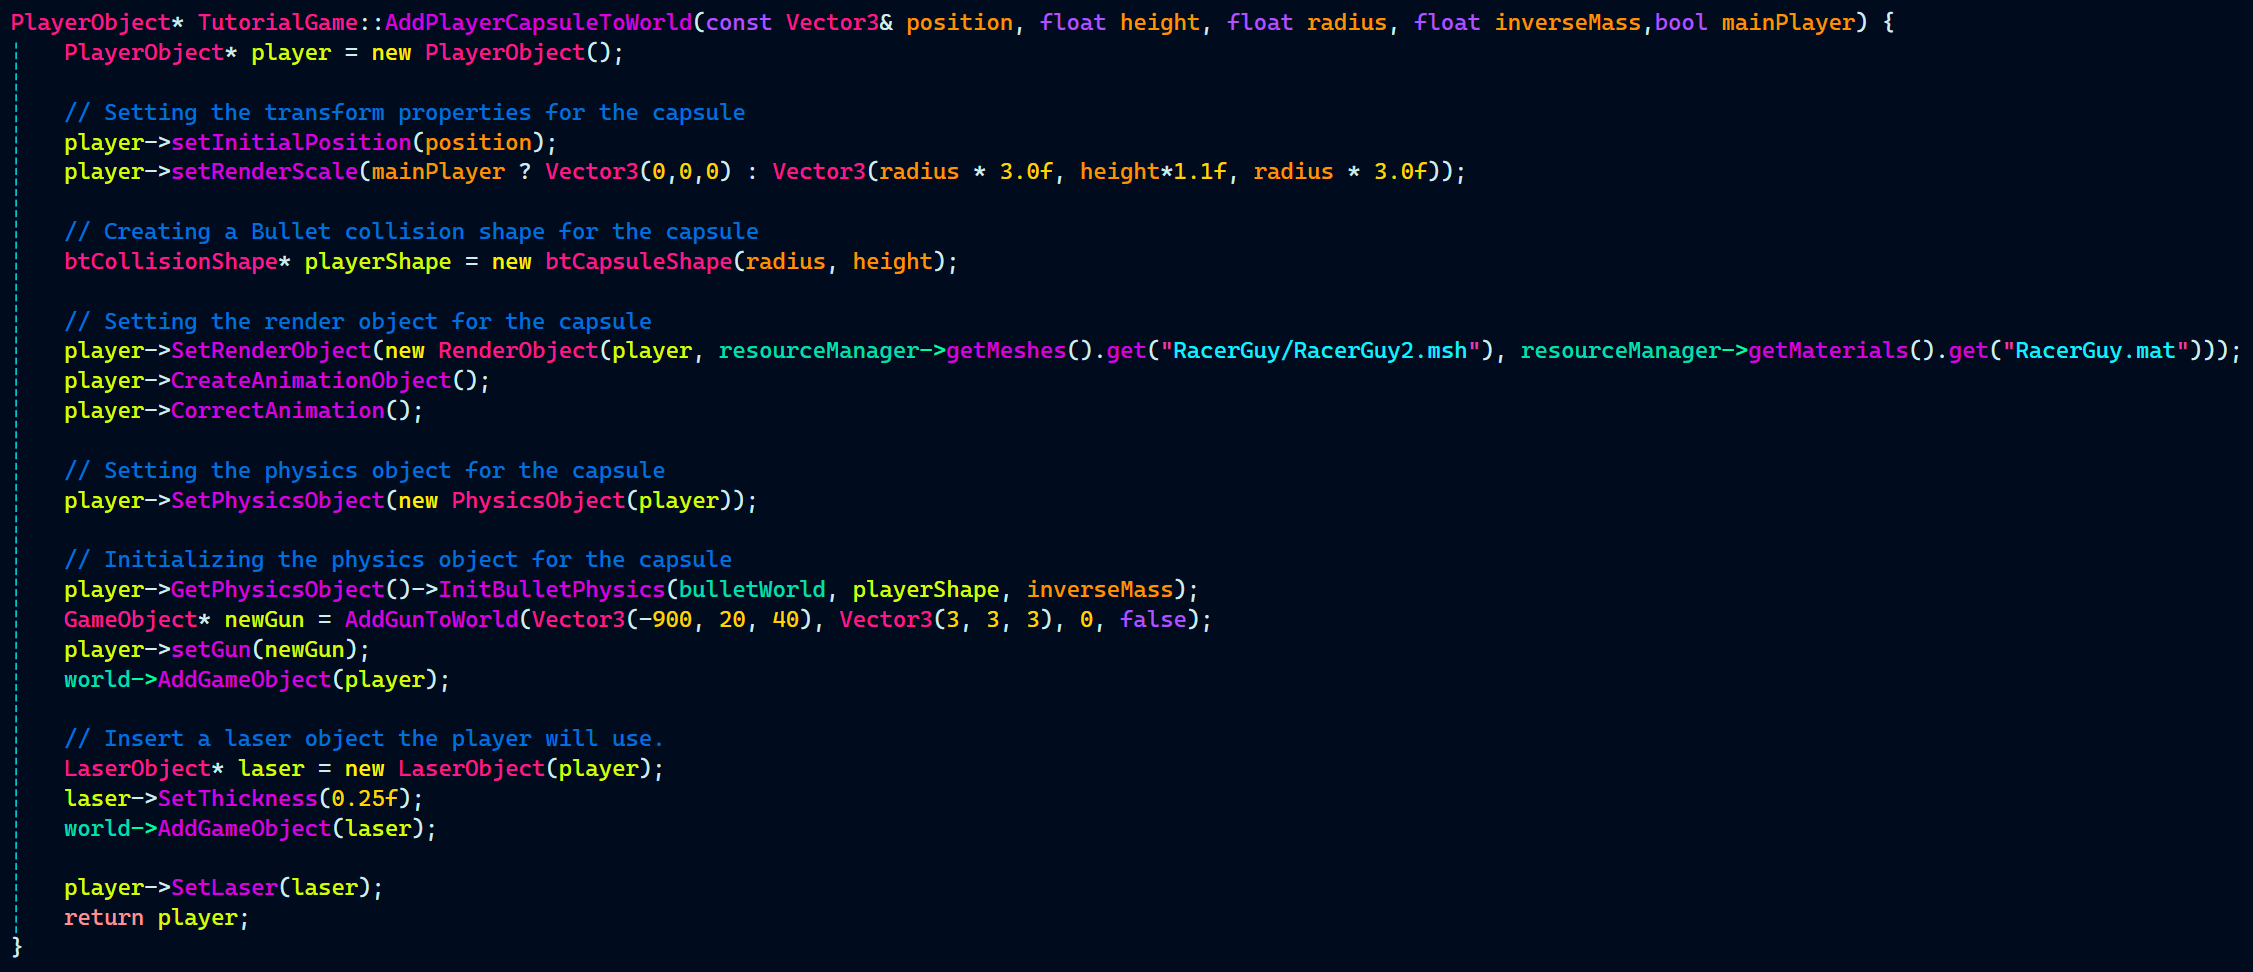
TutorialGame.cpp is the file where all the game objects are created. So, below is one example of how I added a game object to the world so that Bullet’s physics acts upon it.
Bullet requires an initial position to spawn the object at that position in the Bullet’s physics world. setRenderScale sets the scale of the mesh. Shape of the objects are created using btCollisionShape base class. Since I wanted to create a player game object I created a shape called playerShape with the child class called btCapsuleShape.
SetRenderObject, sets the mesh and material of the object.
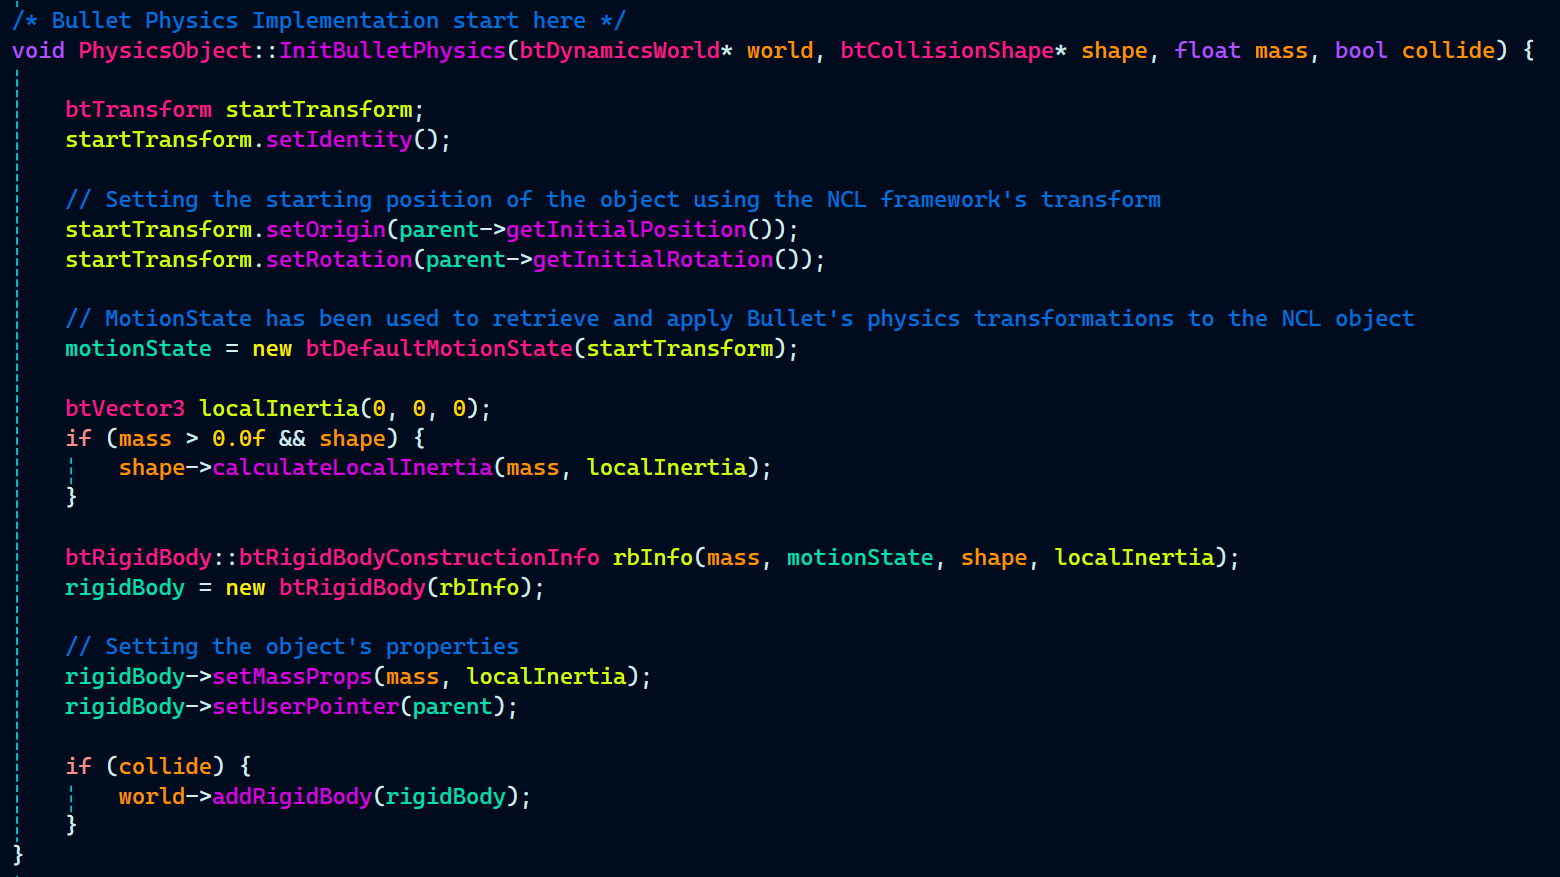
Most Importantly, it is the InitBulletPhysics function implemented in PhysicsObject.cpp that adds the game object to the Bullet’s physics world.
PhysicsObject header includes it’s constructor, destructor, and InitBulletPhyiscs() function. It also includes functions for physics properties that can be applied to the physics objects. Some getter functions as well a check for collisions function.
PhysicsObject.h:
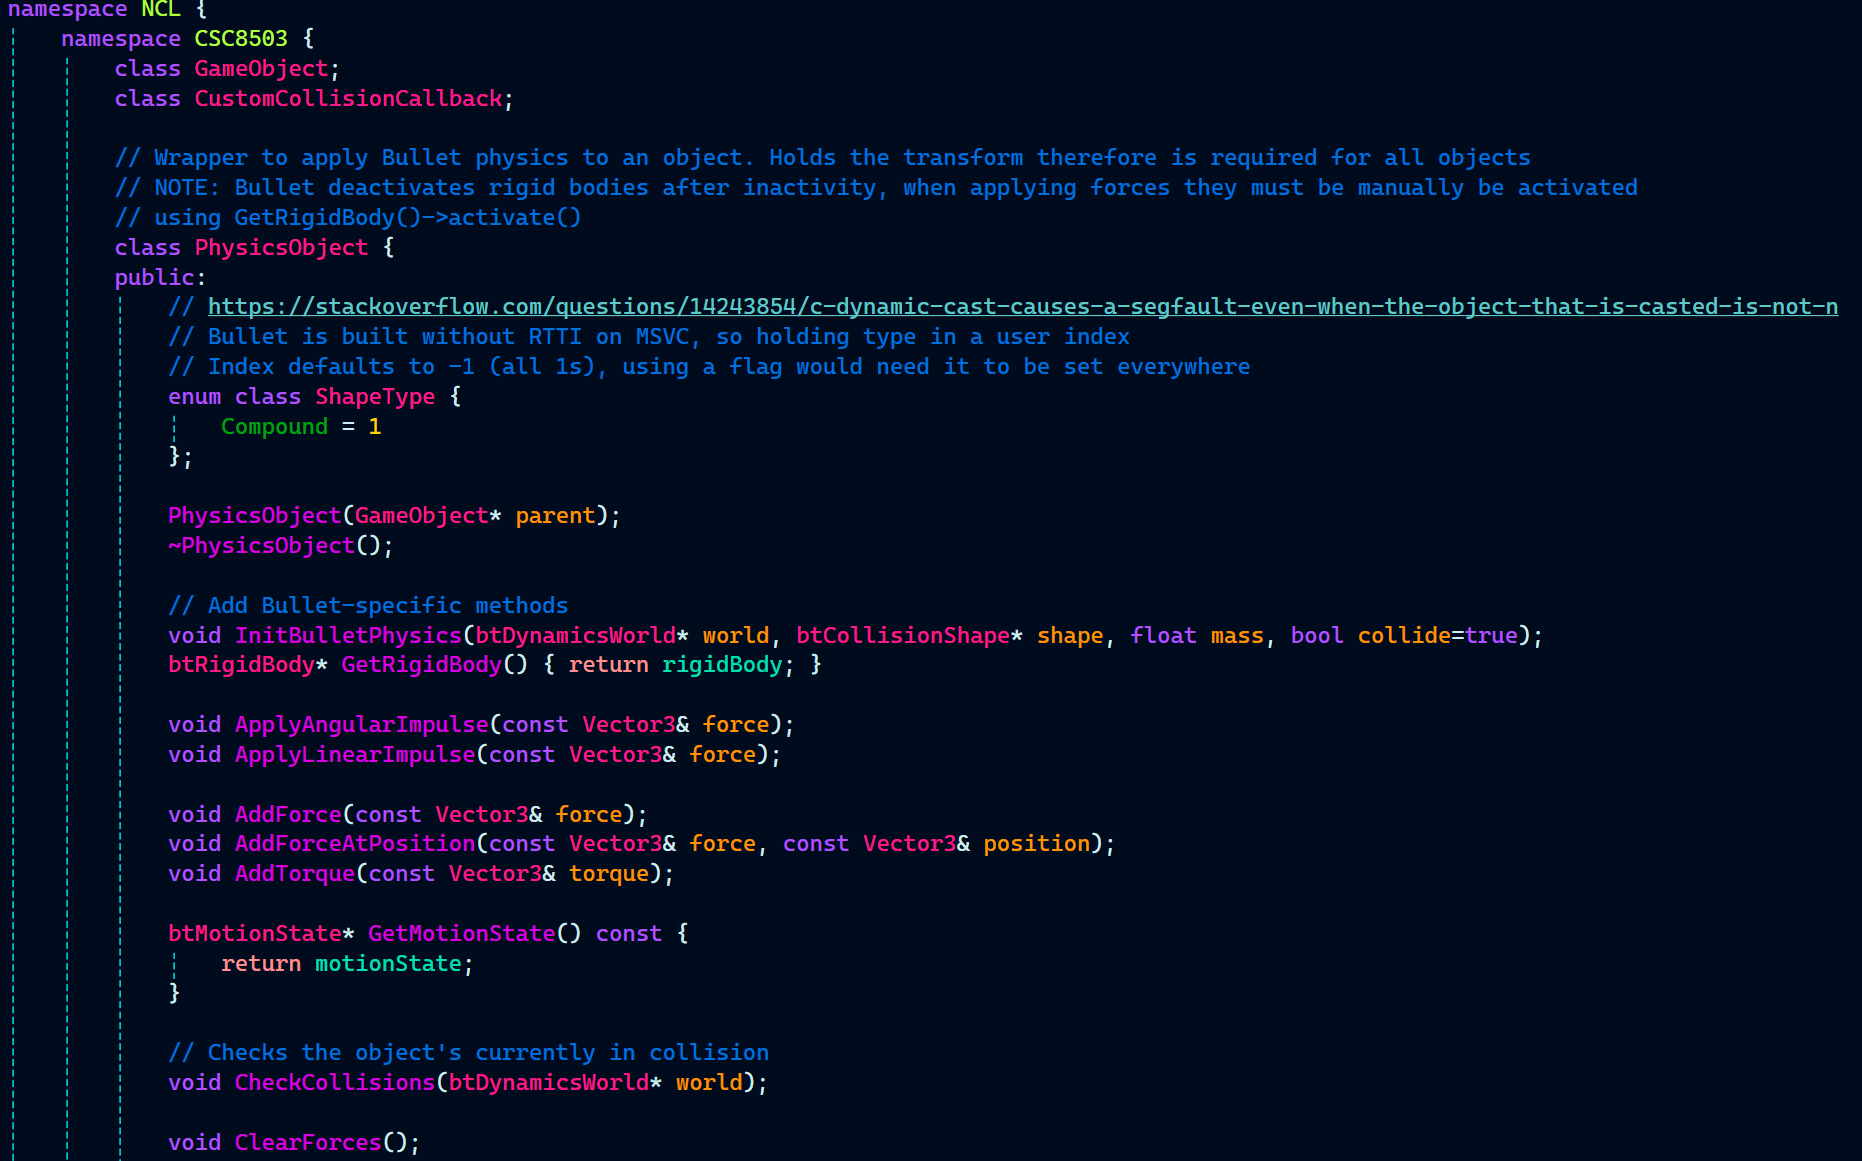
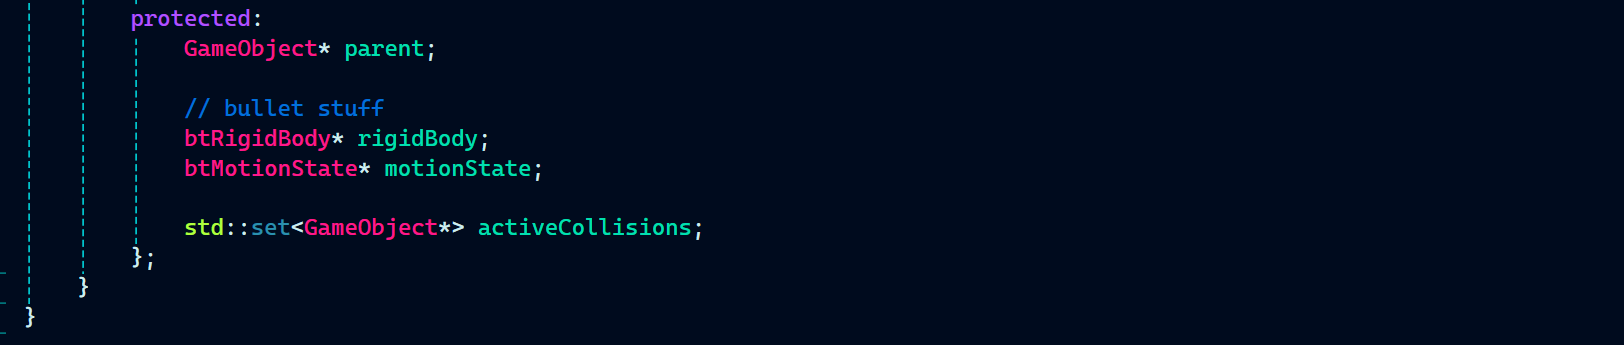
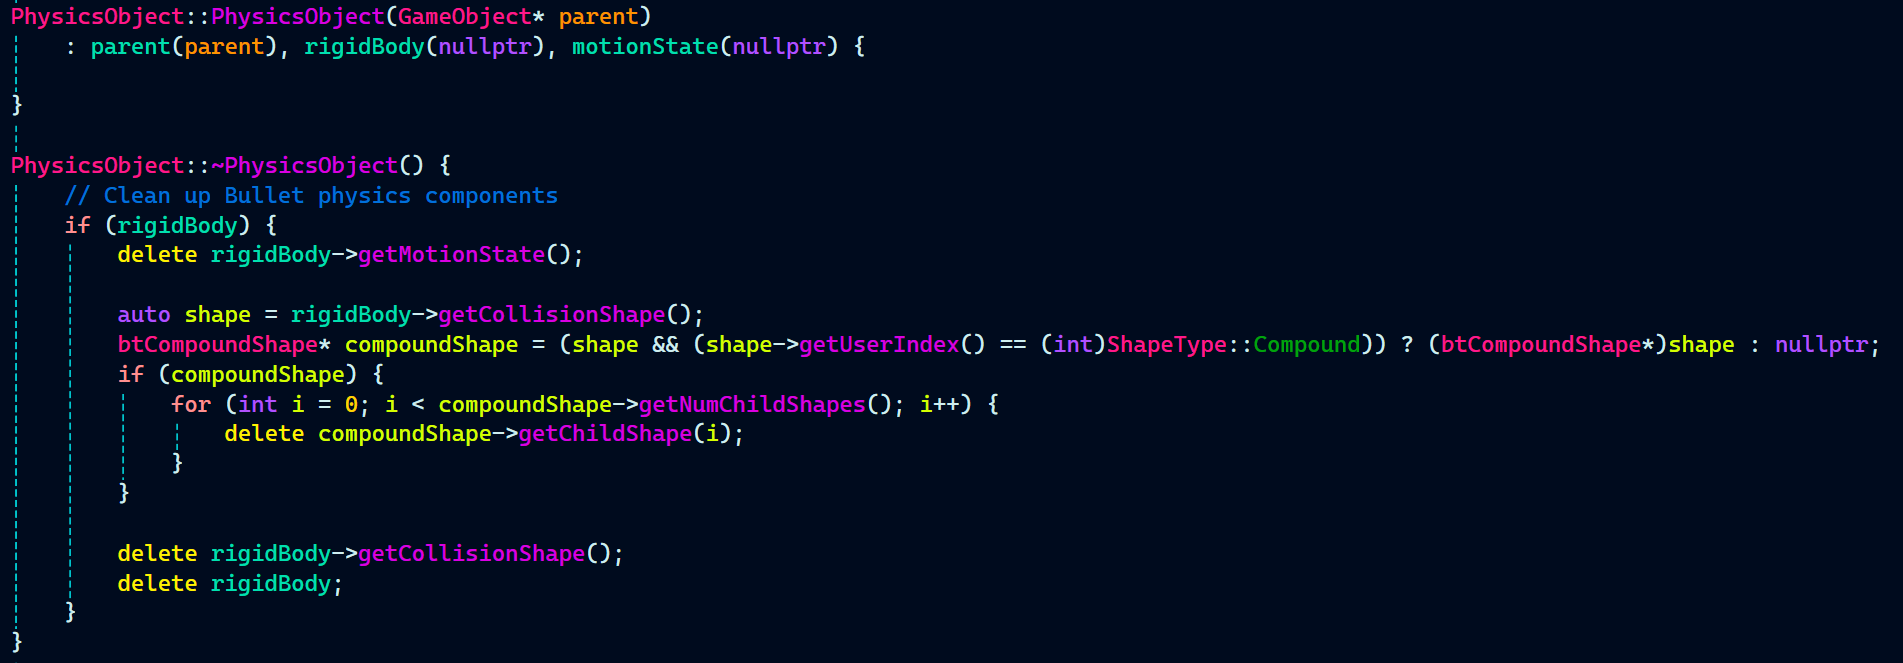
Next, I initialized some variables like game object (named as parent), rigidbody, and motionState (responsible for all the movement).
Rigidbodies also needed to be cleared here in the PhysicsObject’s constructor.
PhysicsObject.cpp:
Now comes a key function that is root of all the physics simulation in the game. This function adds the game objects to Bullet’s physics world. Just adding them in the Bullet’s physics world and setting some physics properties like adding a rigidbody to it and setting it’s mass. does the job.
Then, I implemented some physics properties like applying force, torque, and impulse to the game object’s rigidbodies.

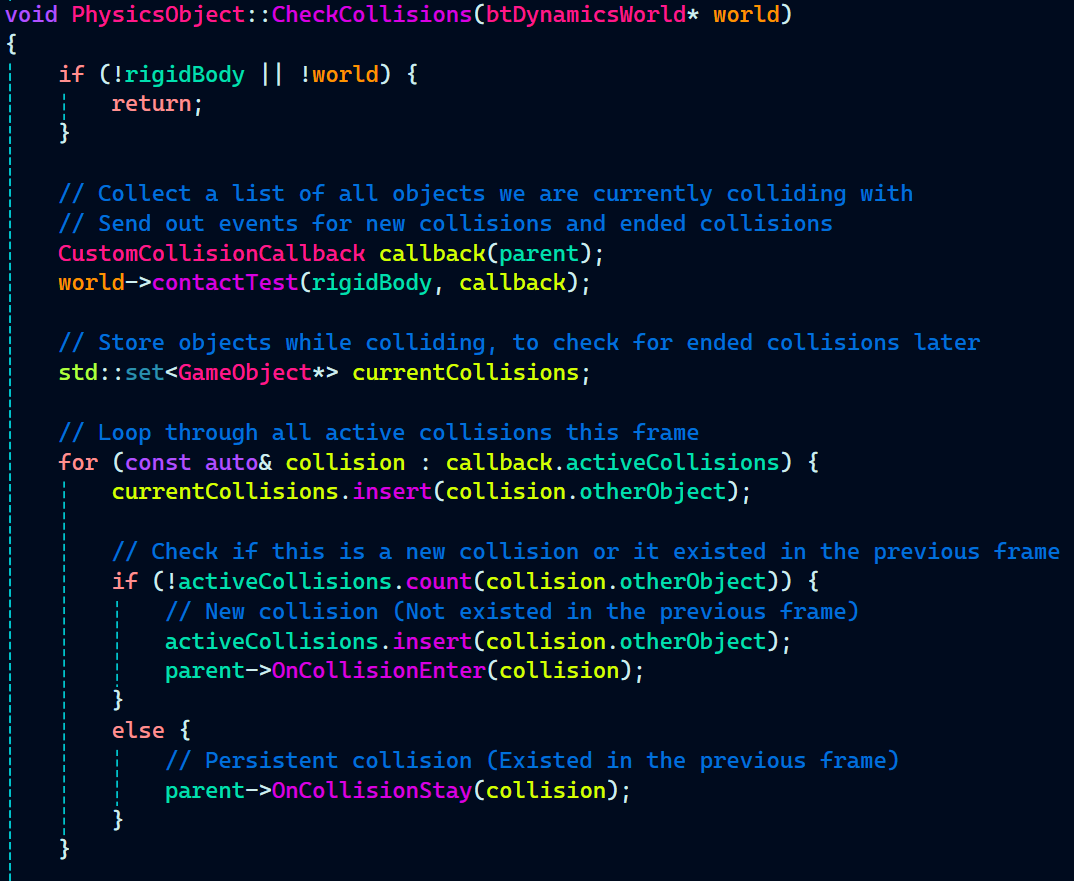
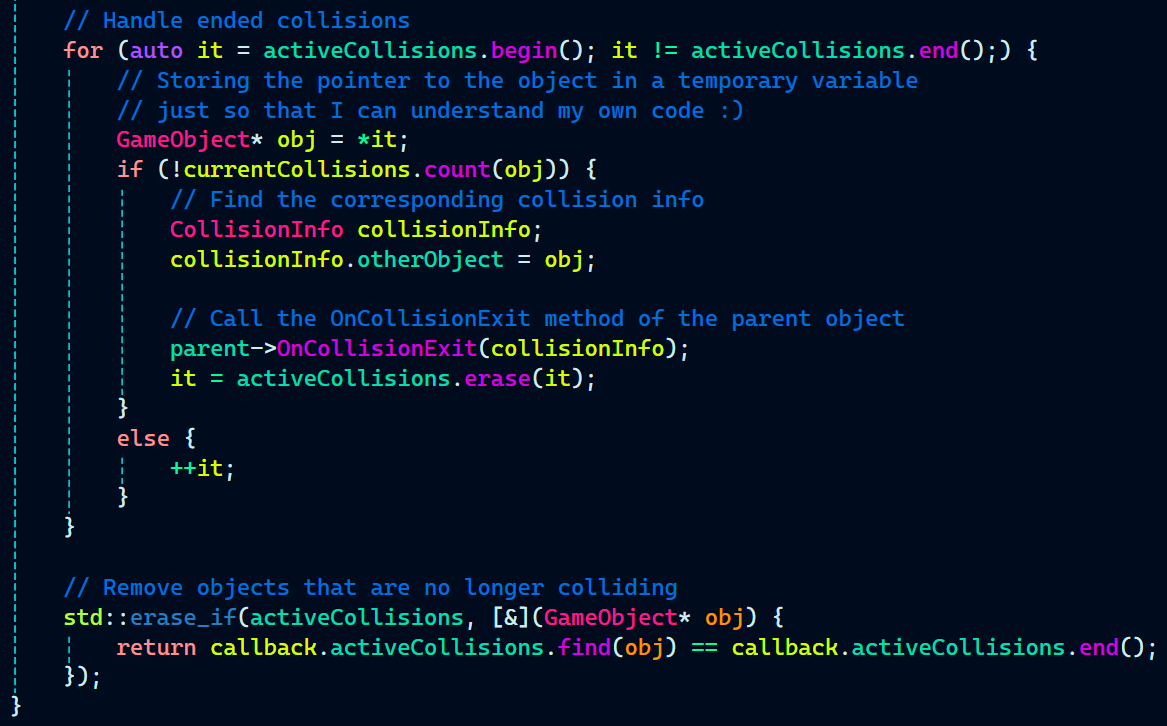
Next, comes the part that I enjoyed the most while integrating Bullet with our custom game engine. This function is called CheckCollisions() and as the name suggest, is responsible for checking collision between the game objects that are active, as bullet automatically disabled inactive game objects after a while.
The reason this function is the best part for me is, it also includes three familiar functions that you may have seen in Unity as well. I have implemented OnCollision events like OnCollisionEnter, OnCollisionExit, and OnCollisionStay quite similar to how they are implemented in Unity.
CustomCollisionCallback callback(parent); creates an instance of CustomCollisionCallback, passing parent (likely the owning GameObject) to handle collision responses.
world->contactTest(rigidBody, callback); checks for collisions between rigidBody and other objects in world, using callback to process collision data.
parent->OnCollisionEnter(collision); is called when a new collision is detected, triggering an event similar to Unity’s OnCollisionEnter.
parent->OnCollisionStay(collision); is executed for ongoing collisions, mimicking Unity’s OnCollisionStay to handle continuous interactions.
parent->OnCollisionExit(collisionInfo); is triggered when a collision ends, functioning like Unity’s OnCollisionExit to notify when objects stop colliding.
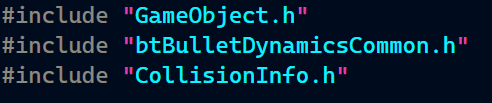
Now, it’s time for that part of the code all the magic happens. It’s implemented in a very simple and easy-to-understand way. Let’s start with what headers the file needs:
CustomCollisionCallback.h:
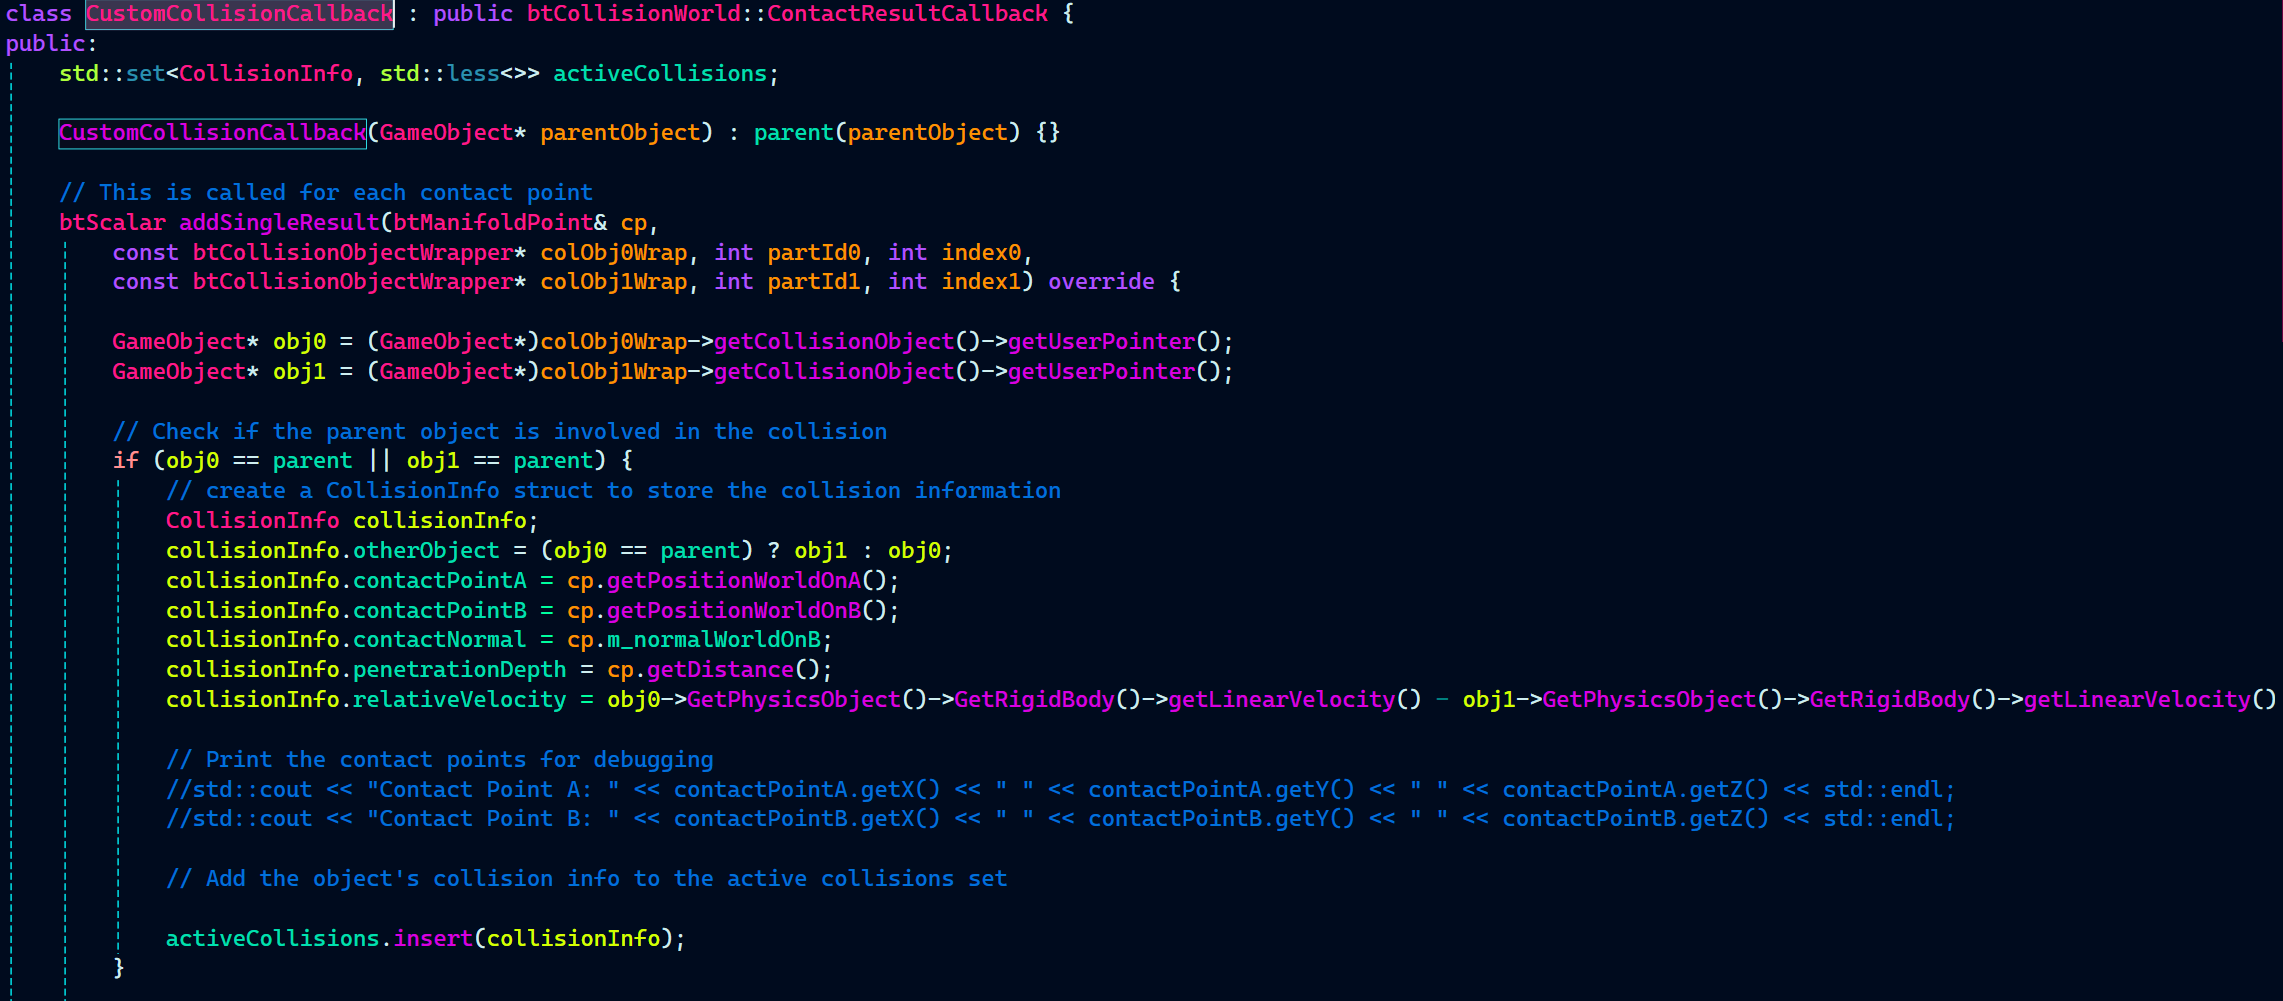
Now off to the actual stuff happening in CustomCollisionCallback. btCollisionWorld::ContactResultCallback is a Bullet Physics callback class that allows custom handling of collision results by overriding the addSingleResult function, which is called for each contact point detected in a collision test.
std::set<CollisionInfo, std::less<>> activeCollisions; stores details of all active collisions during the current frame.
CustomCollisionCallback(GameObject* parentObject) : parent(parentObject) {} initializes the callback with a reference to the parent object to track its collisions.
btScalar addSingleResult(…) override is called for each detected collision, gathering information like contact points, normal, penetration depth, and relative velocity.
activeCollisions.insert(collisionInfo); adds the detected collision to the set, ensuring it can be processed later for collision events.

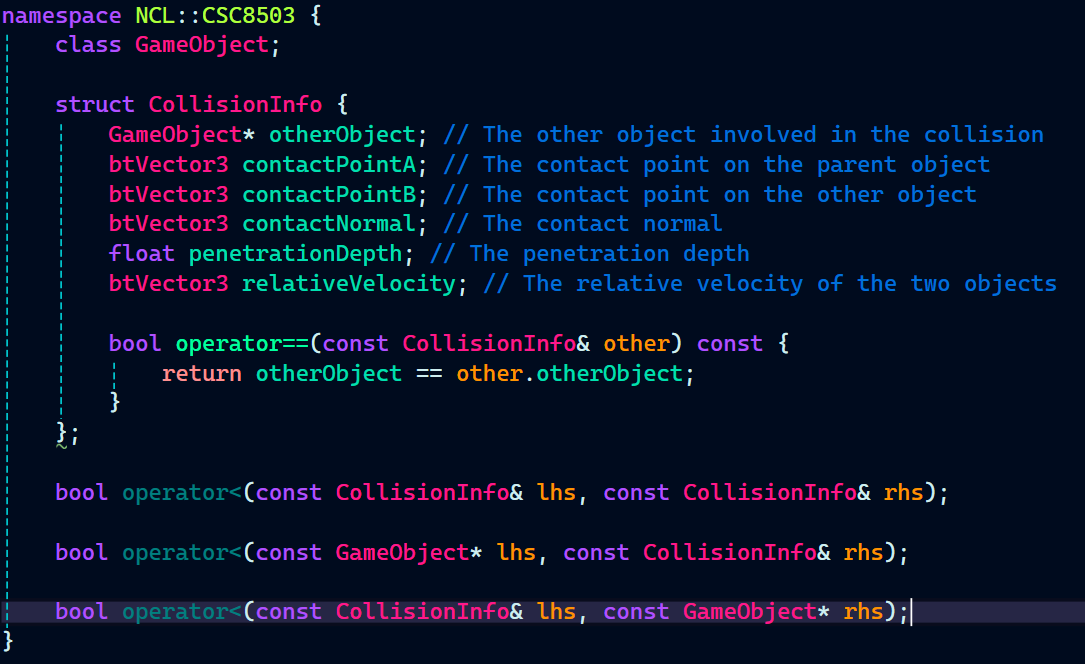
CollisionInfo.h:
As you can the activeCollisions set takes a CollisionInfo struct which return a bunch of data related to the collision between the two objects.
Last thing in PhysicsObject is a function to clear all the forces of a rigidbody.
![]()
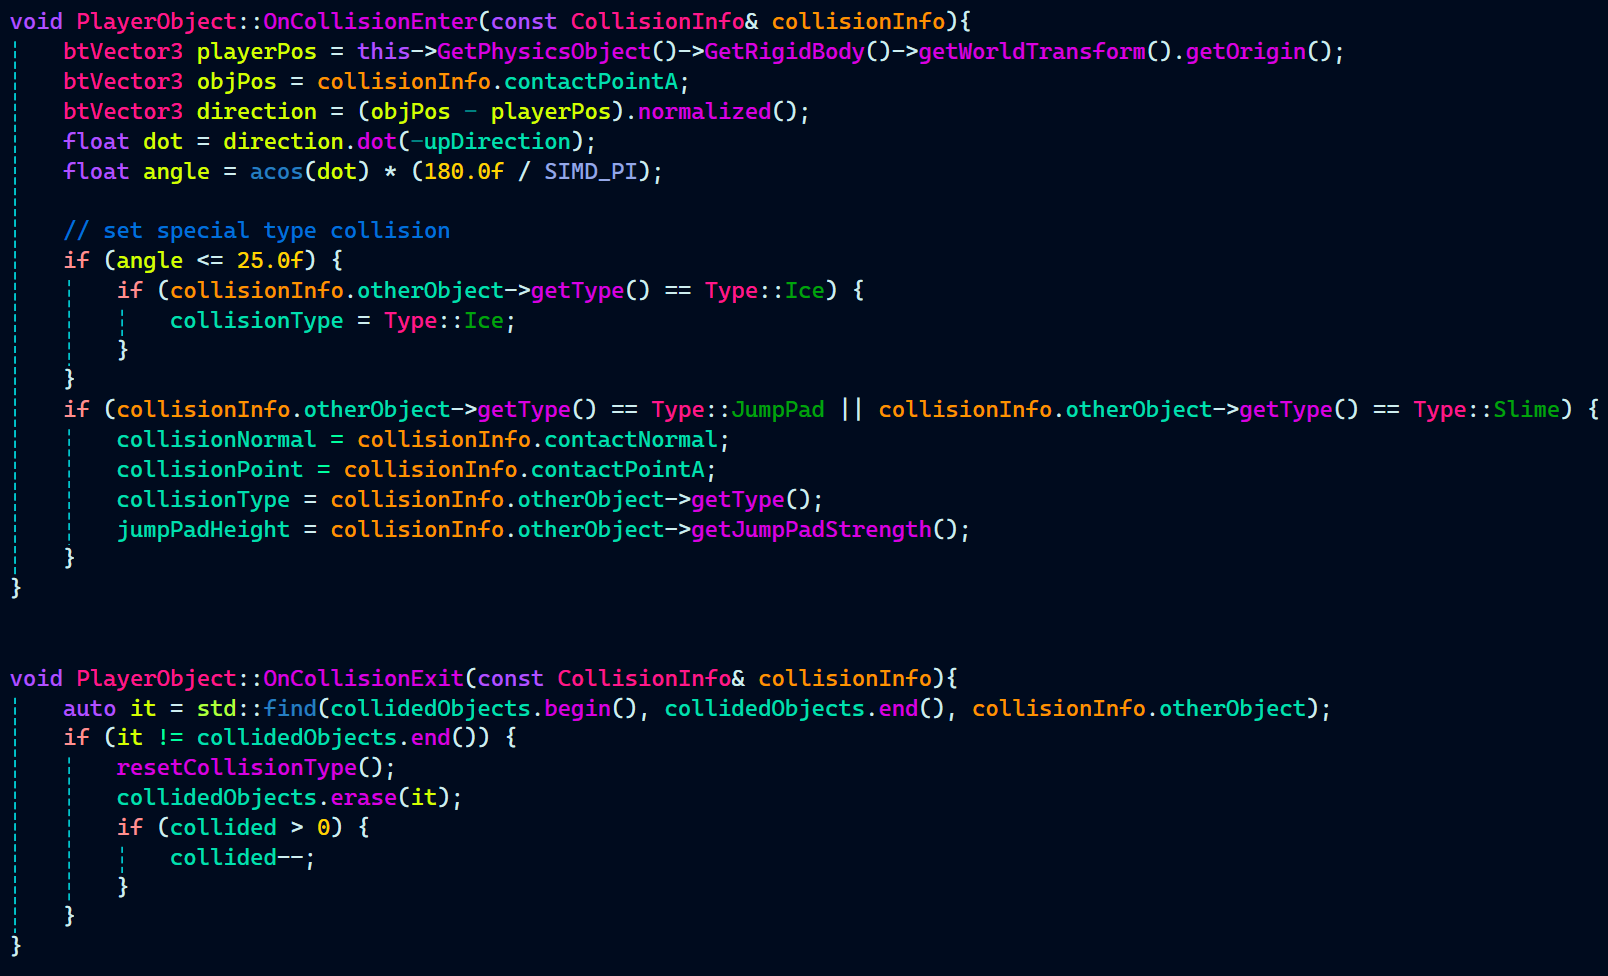
Before leaving the Bullet Middleware Integration implementation, let’s have a look at how these methods have been used for the ground detection by the gameplay programmer Alex Barnett.
Note: The below code has been written by Alex Barnett. It was at his request, I changed the OnCollision events to take in a CollisionInfo struct as an argument rather than just taking multiple parameter like a GameObject, normal, etc.
PlayerObject.cpp:

Decal System
Decal System uses a Screen-Space Projection (Deferred Projection) method to render decals.
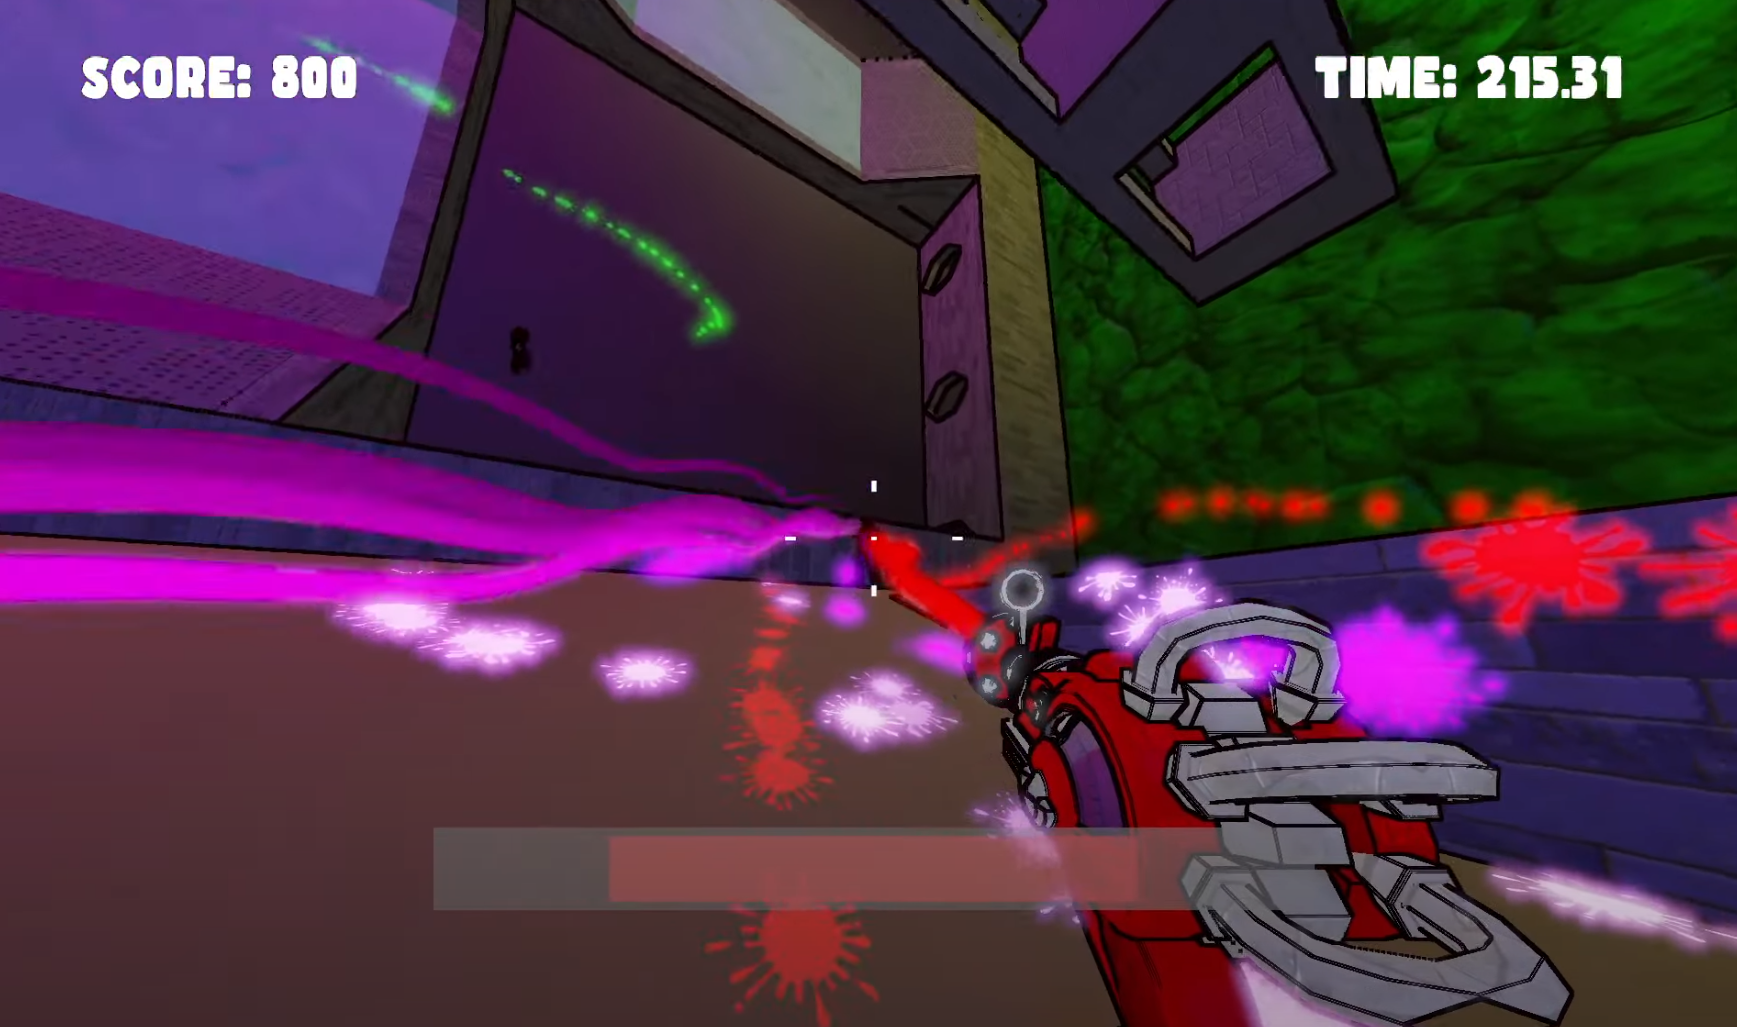
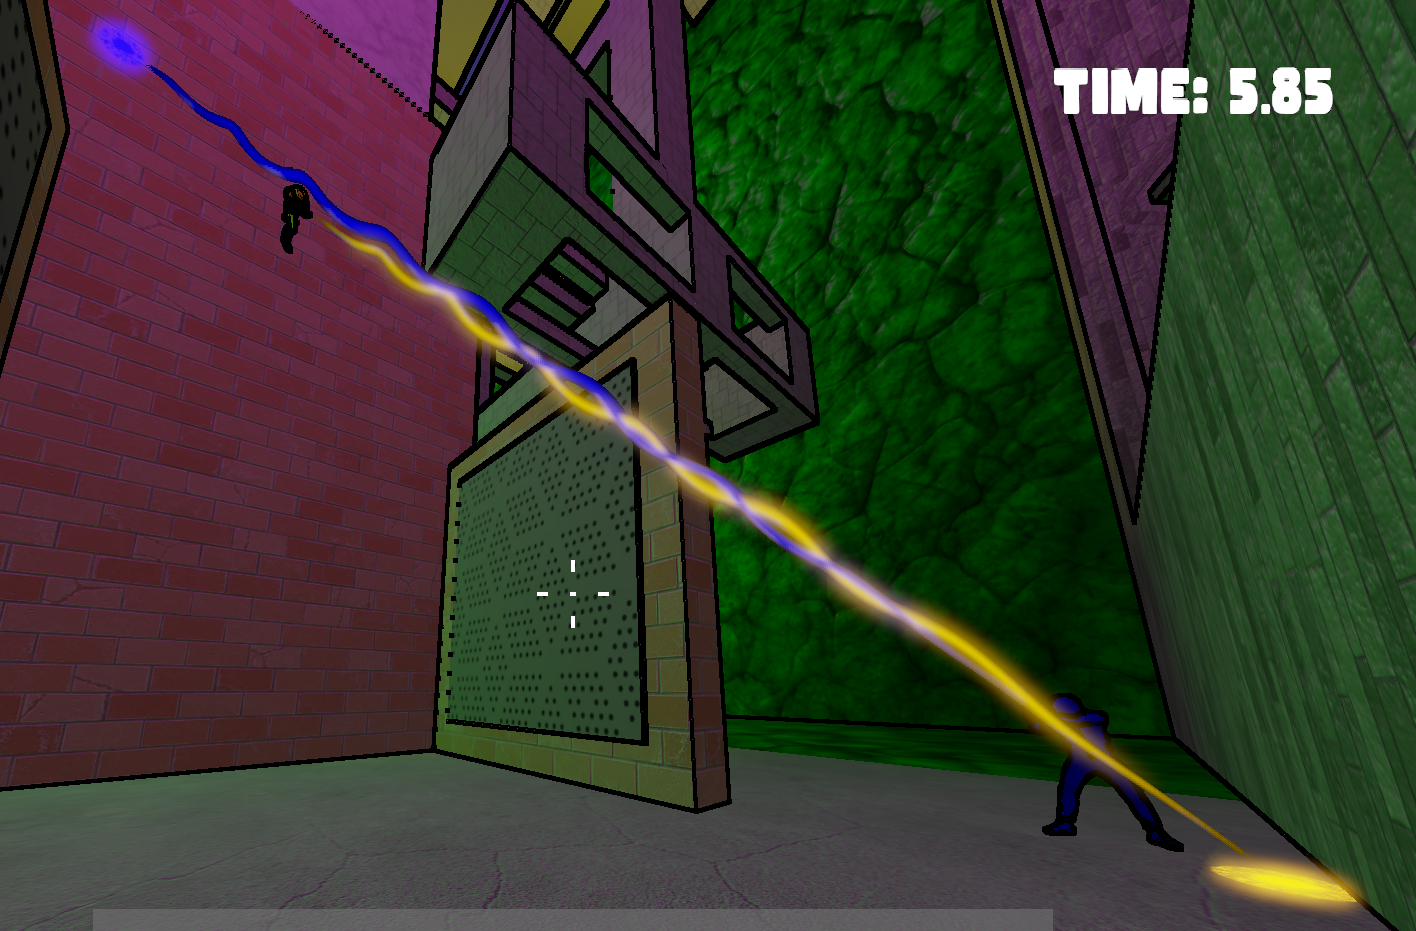
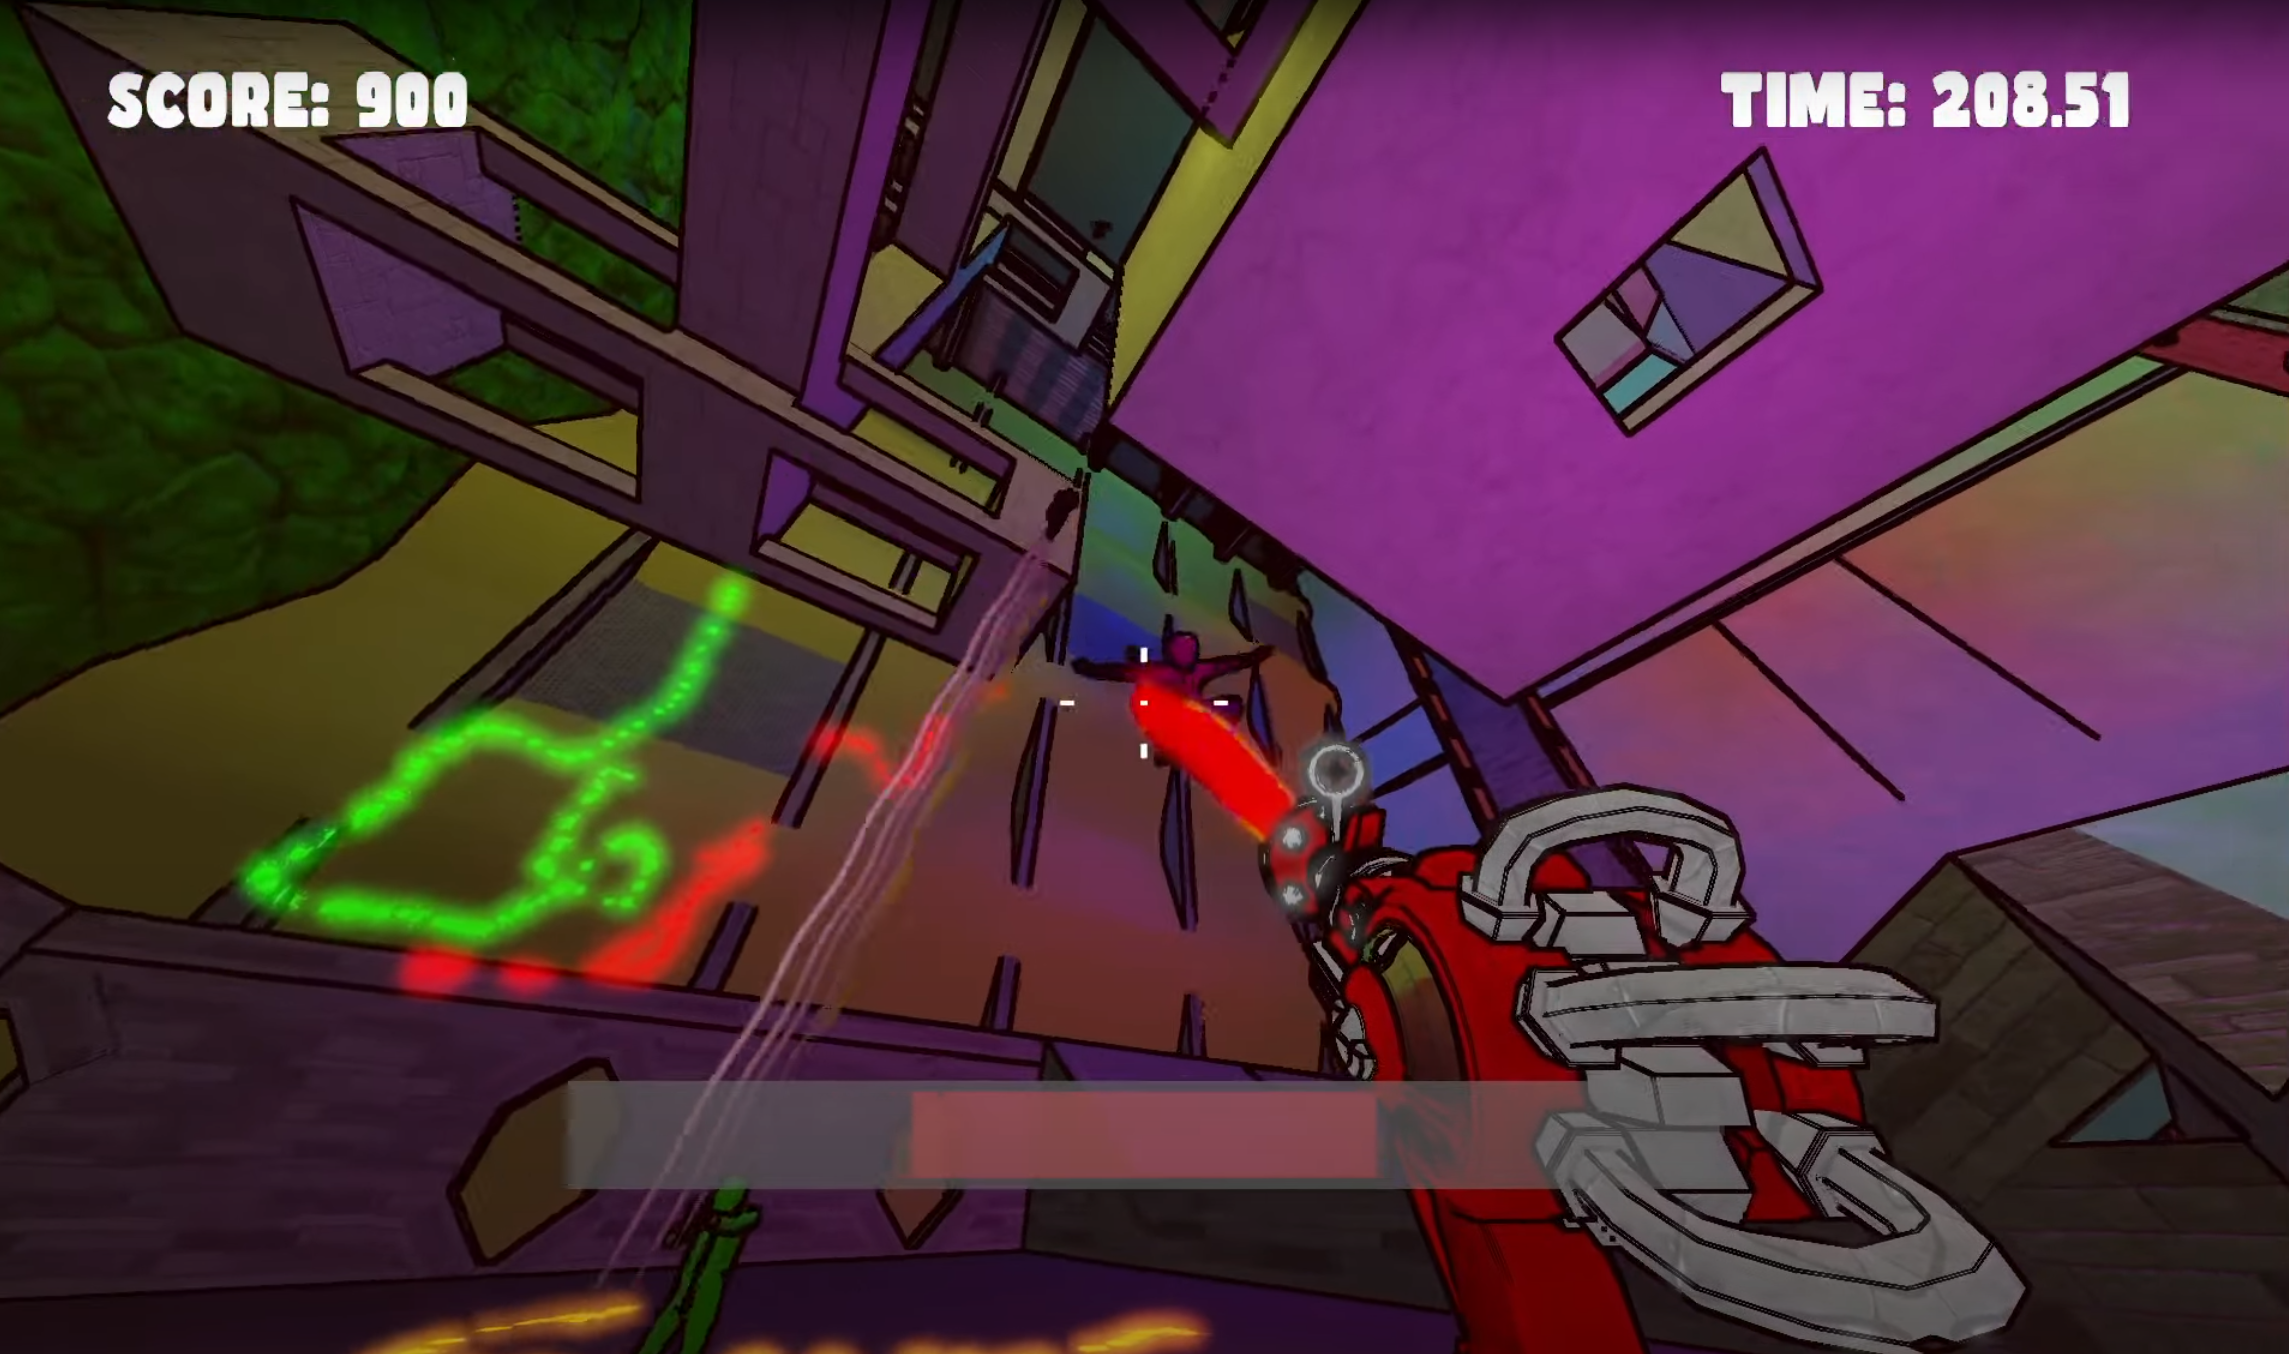
Right after I finished integrating the Bullet physics engine with our custom game engine, I started working on the decal system. Decals, along with lasers, play a crucial role in the game by revealing where the player is shooting from, as players can be on any wall inside the cube.
The bloom effect added by our graphics programmer, Max Davidson, made the decals glow, further enhancing the game’s overall appearance.
As mentioned earlier, we followed an object-oriented approach for our game engine. As a result, all decal-related functions and data were written in two files, except for the rendering part, which belongs to GameTechRenderer.cpp—the file responsible for handling everything related to rendering.
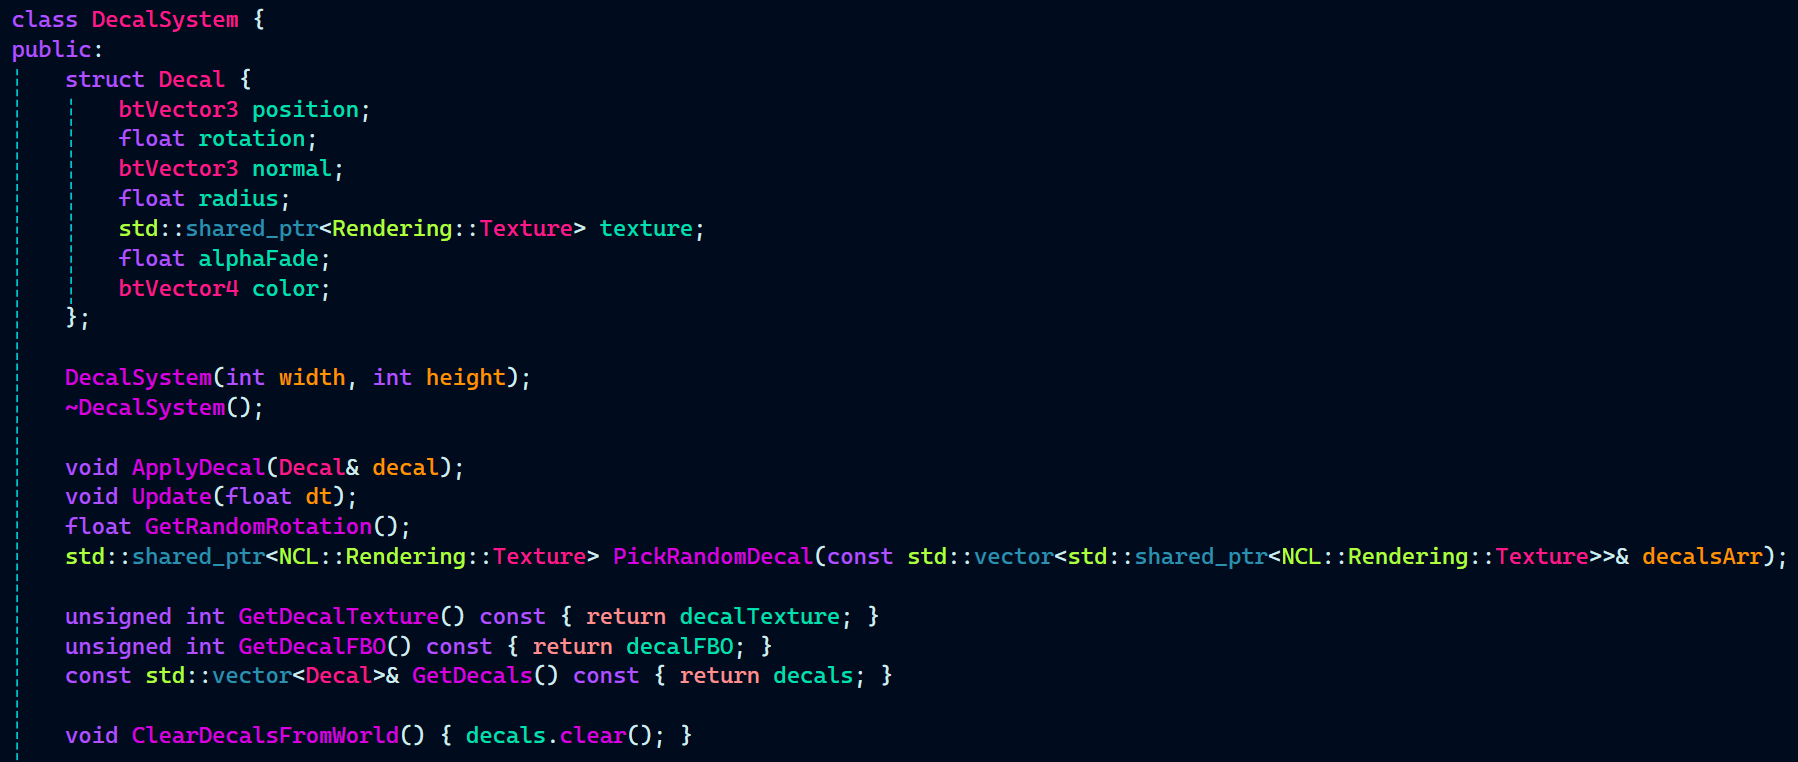
I began implementing the Decal System by creating a Decal struct to store all relevant data, such as position, normal, and other attributes. Following the object-oriented approach, I implemented the constructor (which takes in the width and height of the decal texture) and the destructor.
Next, I implemented ApplyDecals(), a function used by the gameplay programmer to spawn decals at the hit point of the ray. The Update function handles decal fading over time.
To introduce some randomness, I implemented GetRandomRotation() and PickRandomDecal(). These functions handle rotating the decal around its normal and randomly selecting decal textures.
In Decals.h, I added getter functions that return the decal texture, decal FBO, and a vector array of decals. The RenderDecals function in GameTechRenderer.cpp then utilizes these getters to finally render the decals on the screen.
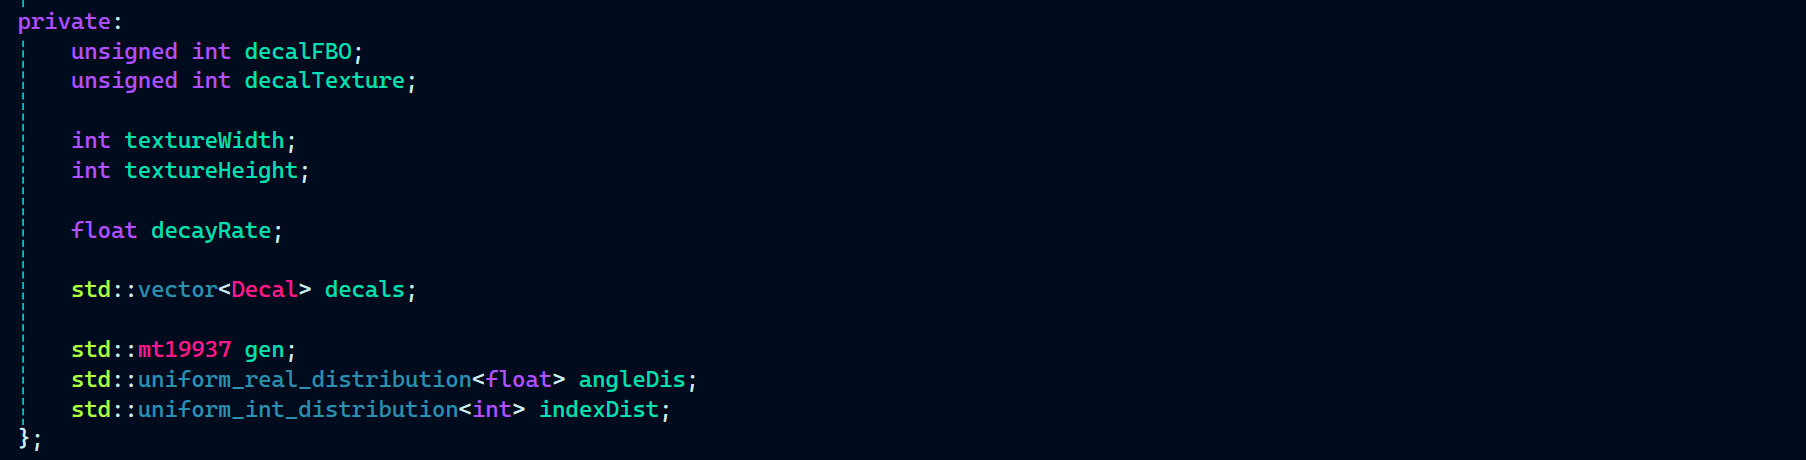
Lastly, there are several variables, all named appropriately and self-explanatory in their purpose.
DecalSystem.h:
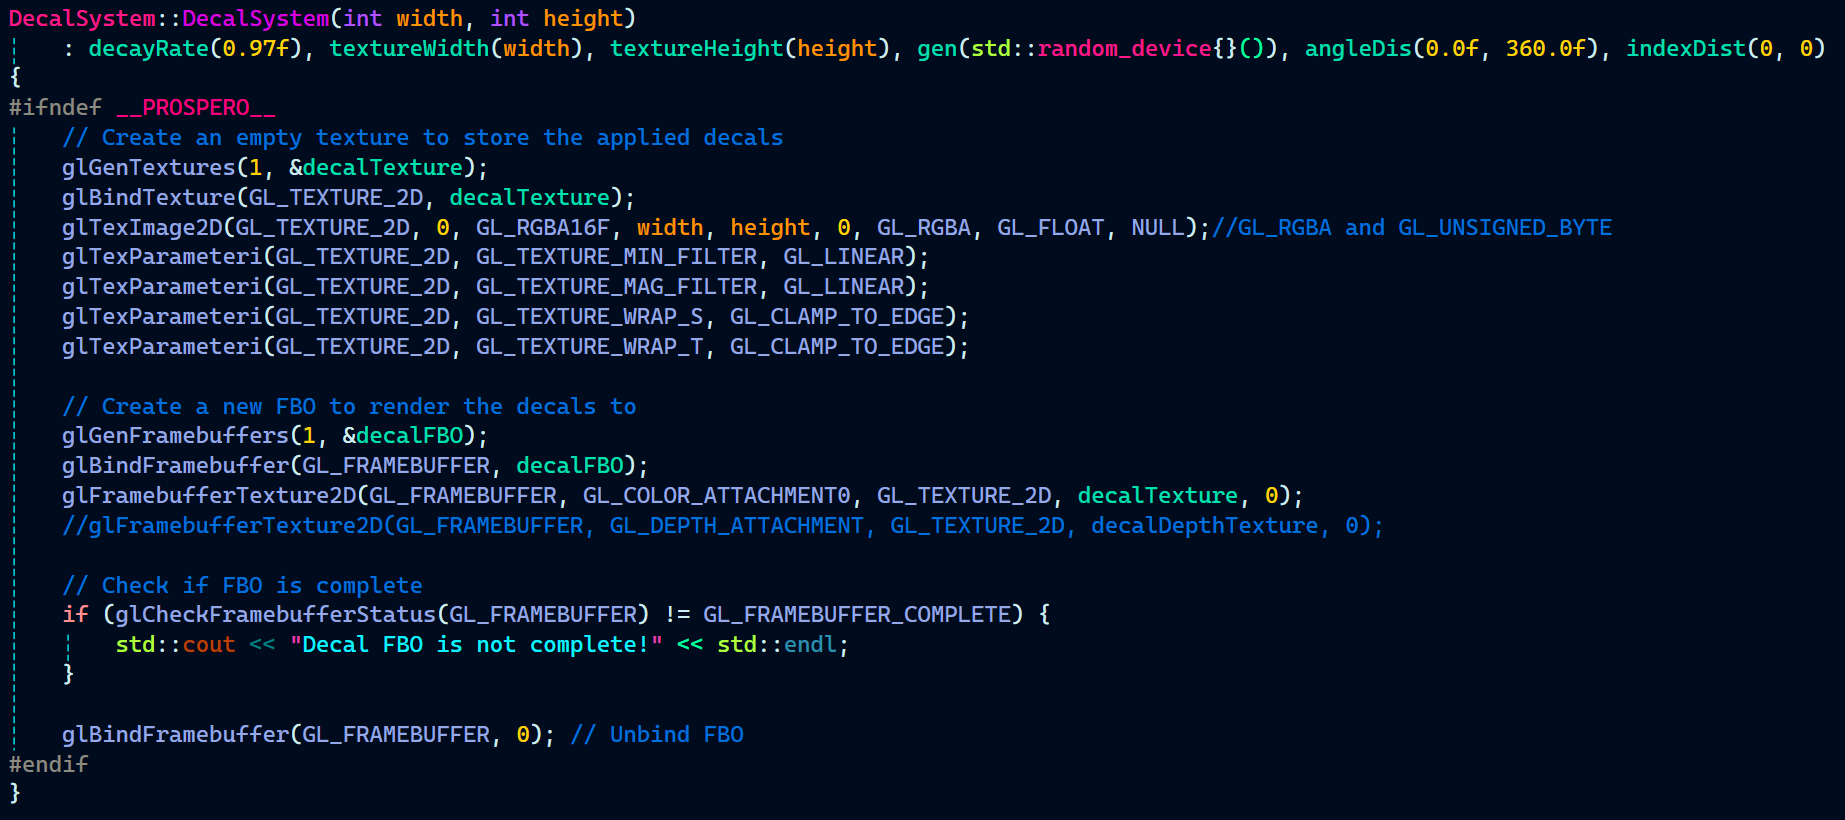
With DecalSystem.h completed, I started implementing the constructor, destructor, and other functions.
The constructor does a lot of heavy lifting for the Decal System by holding and initializing the data using an initializer list. It begins by creating a decal texture and binding it.
Note: As shown, glTexImage2D takes GL_RGBA16F instead of the previous GL_RGBA texture. This change was made to enable proper bloom effects by allowing high-intensity colors to be stored and processed, something that would not be possible with GL_RGBA due to clamping.
After creating the decal texture, I also created an FBO (Frame Buffer Object) to render the decals onto. Once the FBO was created and bound, I attached the decal texture to it for rendering.
That’s essentially the full process for the constructor.
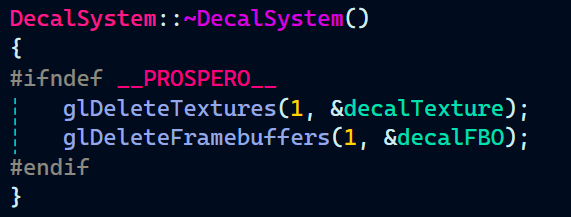
DecalSystem.cpp:
Since the decal texture and decal FBO were created in the constructor, it is equally important to remove them in the destructor.
Note: Perfectly balanced, as all things should be.
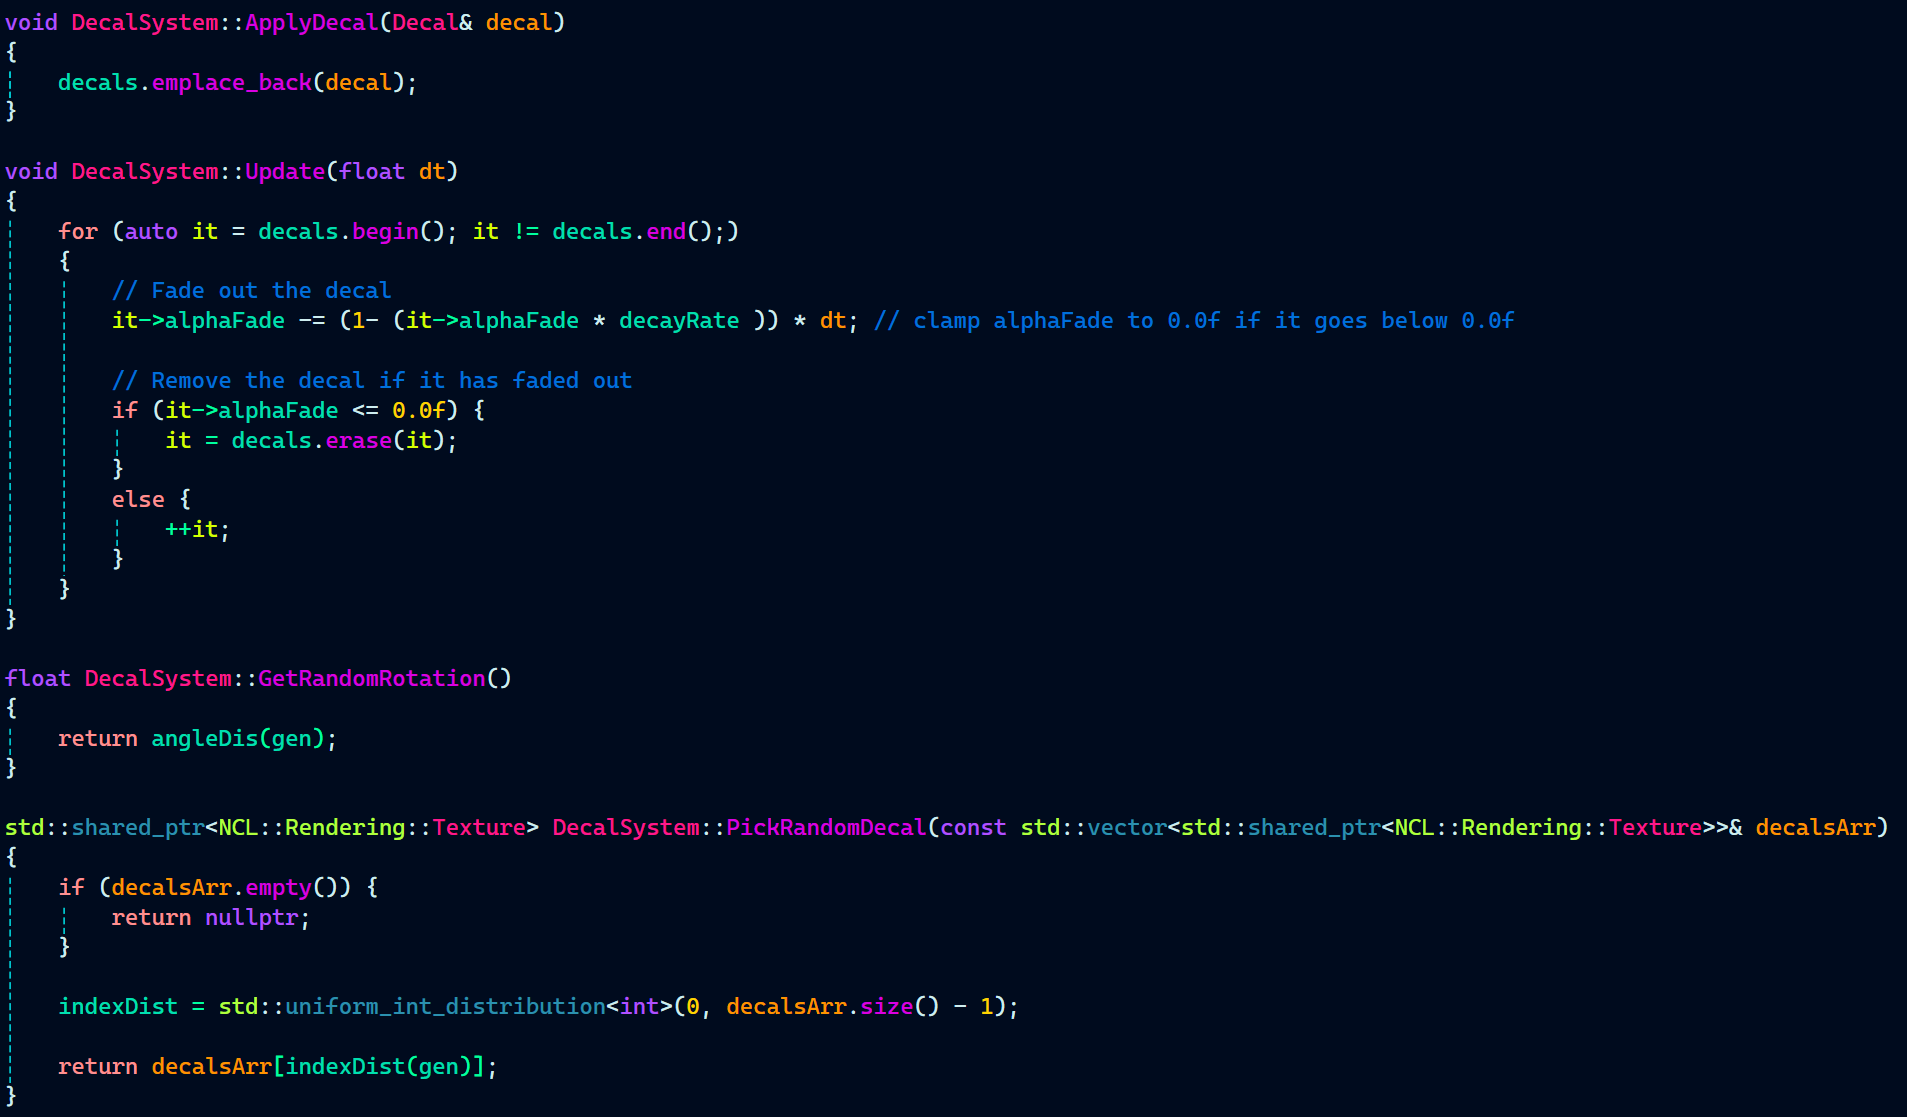
With the constructor and destructor implemented, I moved on to the other functions that handle all the fun stuff related to decals.The
ApplyDecal() function is responsible for adding a new decal to the decals vector each time it’s called, which typically occurs when a ray intersects a surface. It stores the decal information (position, rotation, etc.) at the specific impact point to render the decal at that location.
The Update method is called every frame. It handles the exponential fading of decals and removes them from the decals vector array once they have completely faded.
As mentioned previously, we wanted a bit of randomization for the decals, so there are two functions for this:
- GetRandomRotation() returns a random rotation angle for the decal.
- PickRandomDecal() randomly selects a decal texture from the provided array of decals.
After setting up the decal system, I created a function called RenderDecals() in GameTechRenderer.cpp to handle all the rendering-related logic for decals.
The RenderDecals() function begins by retrieving the decal FBO from the decal system using one of the getter functions I implemented. It then binds the decal FBO to keep it separate from the main scene buffer. This separation is necessary because I implemented decal clipping, which requires depth testing the decal texture (decals rendered as a geometry) against the scene’s depth buffer.
Note: As seen in the DecalSystem constructor, the decal FBO does not have a depth attachment, meaning it does not write any depth values to the buffer. Instead, the depth values from the main scene buffer are already stored in the depth buffer.
Next, glBlitFrameBuffer is use to copy the depth buffer of the scene to the decal FBO. This is to ensure that the decals are projected accurately and not floating in midair.
Then, blending and depth test were enabled for the decal blending with the surface as well as decal clipping to work.
GameTechRenderer.cpp:
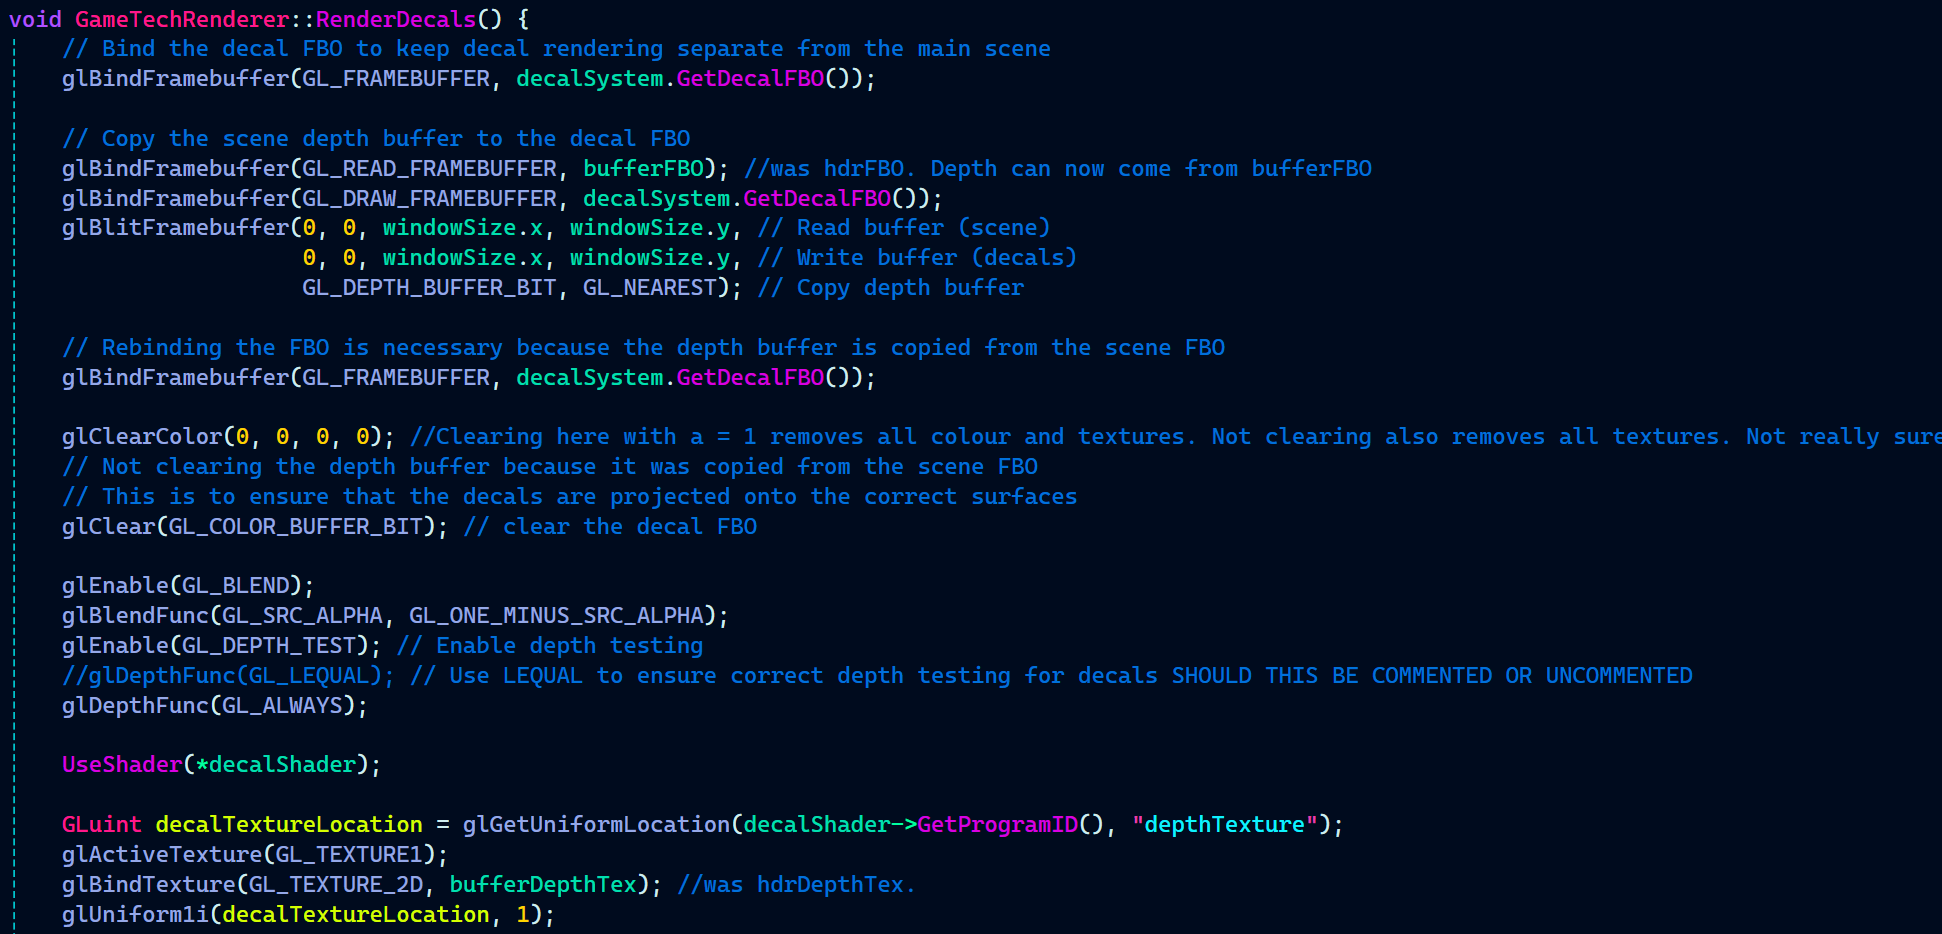
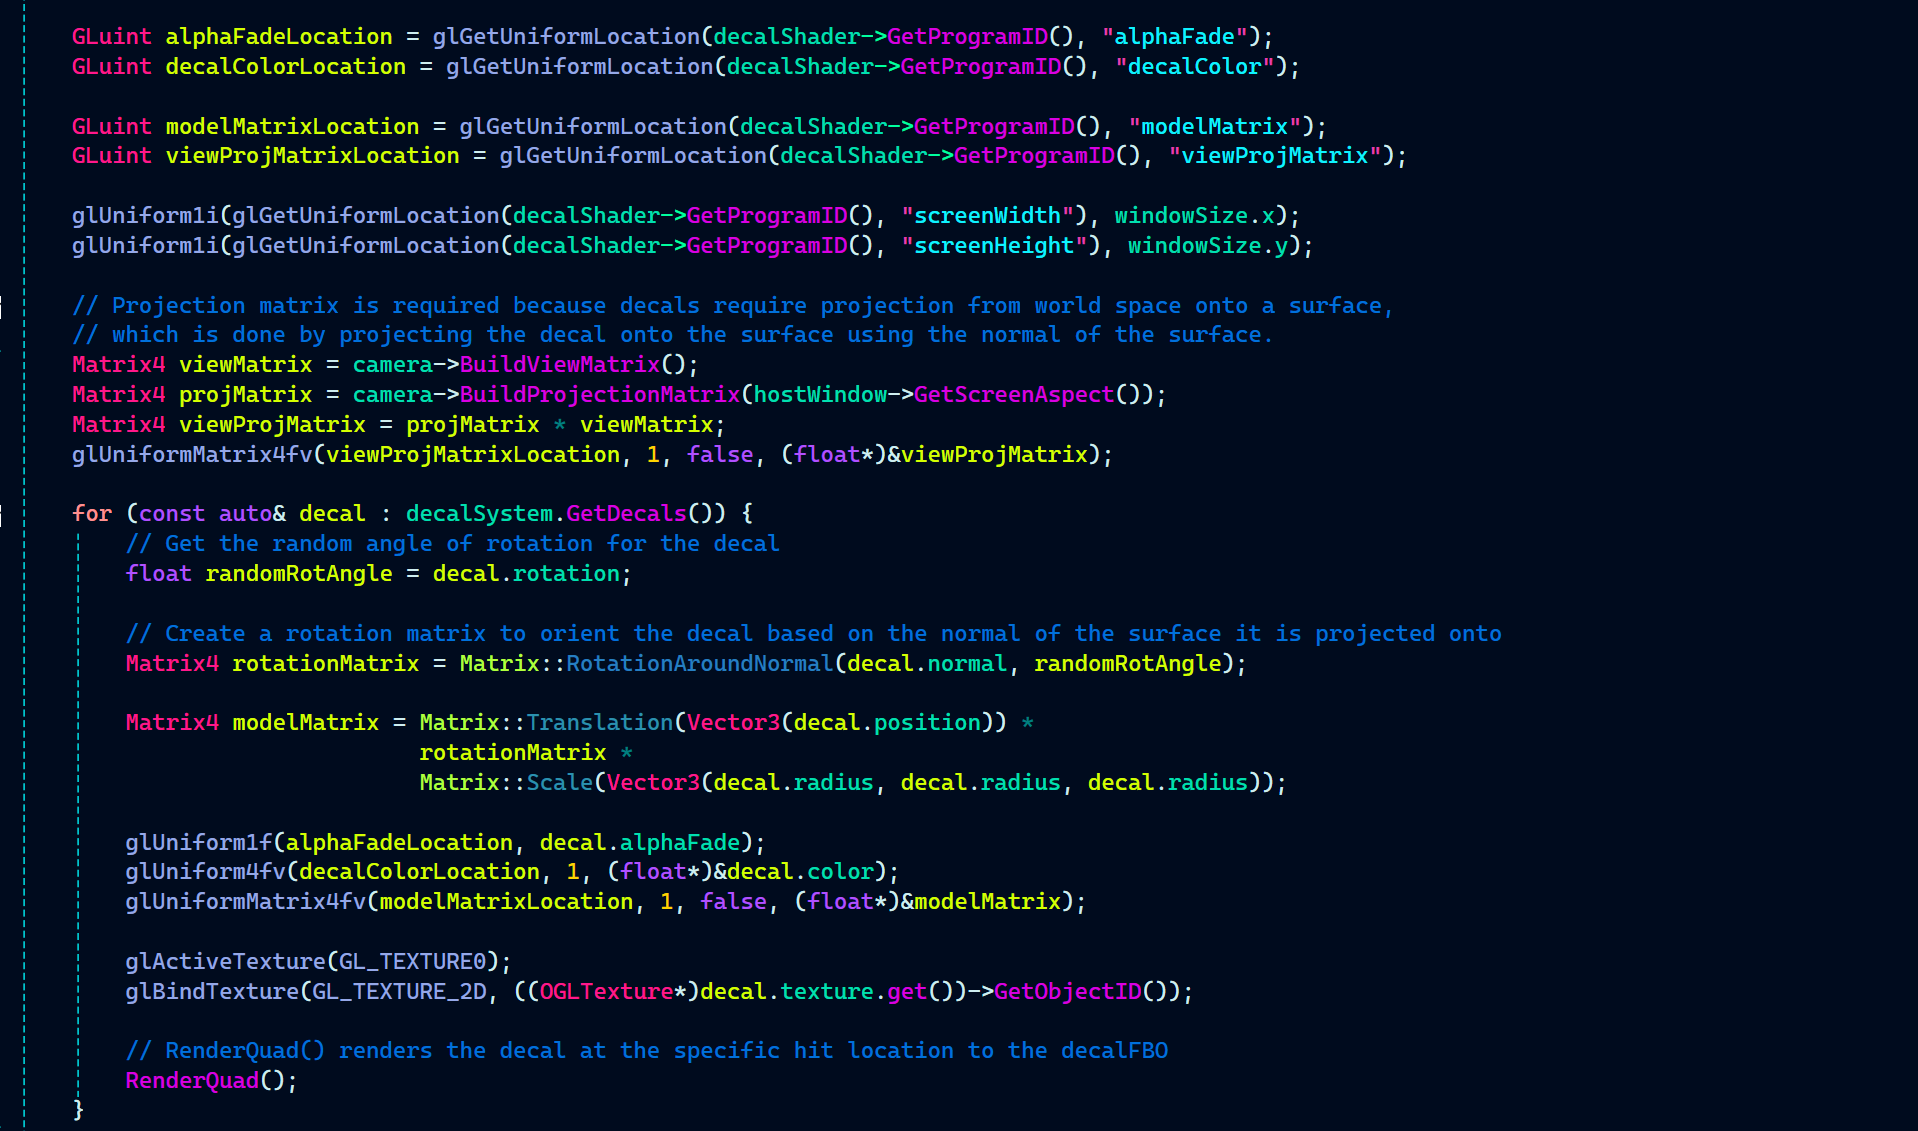
Following up in RenderDecals(), I passed the necessary uniforms, such as alpha fade, decal color, depth texture, etc.
Now, it’s time to render decals the way I intended. The first step is to loop through all the decals stored in the decals vector array.
Inside the loop:
I retrieve the random rotation angle stored in the Decal struct.
Using this angle, I create a rotation matrix that rotates the decal based on the normal of the surface it is projected onto. The rotation matrix was created in Matrix.h file using Rodrigues’ rotation formula that I found on stack overflow.
Matrix.h:

Decal struct also holds position and radius of the decals along with it’s rotation. And these three are required to create the model matrix. So, I created the model matrix and used the position, rotation matrix, and the radius to spawn the decal in a desired way.
With all the shenangians done for the decal, it’s time to finally activate the decal texture and bind it to the shader. Last thing the loop does is call the RenderQuad function that renders a fullscreen quad which is use to process every pixel on the screen and decide where to apply the decal texture based on the depth.
GameTechRenderer.cpp:
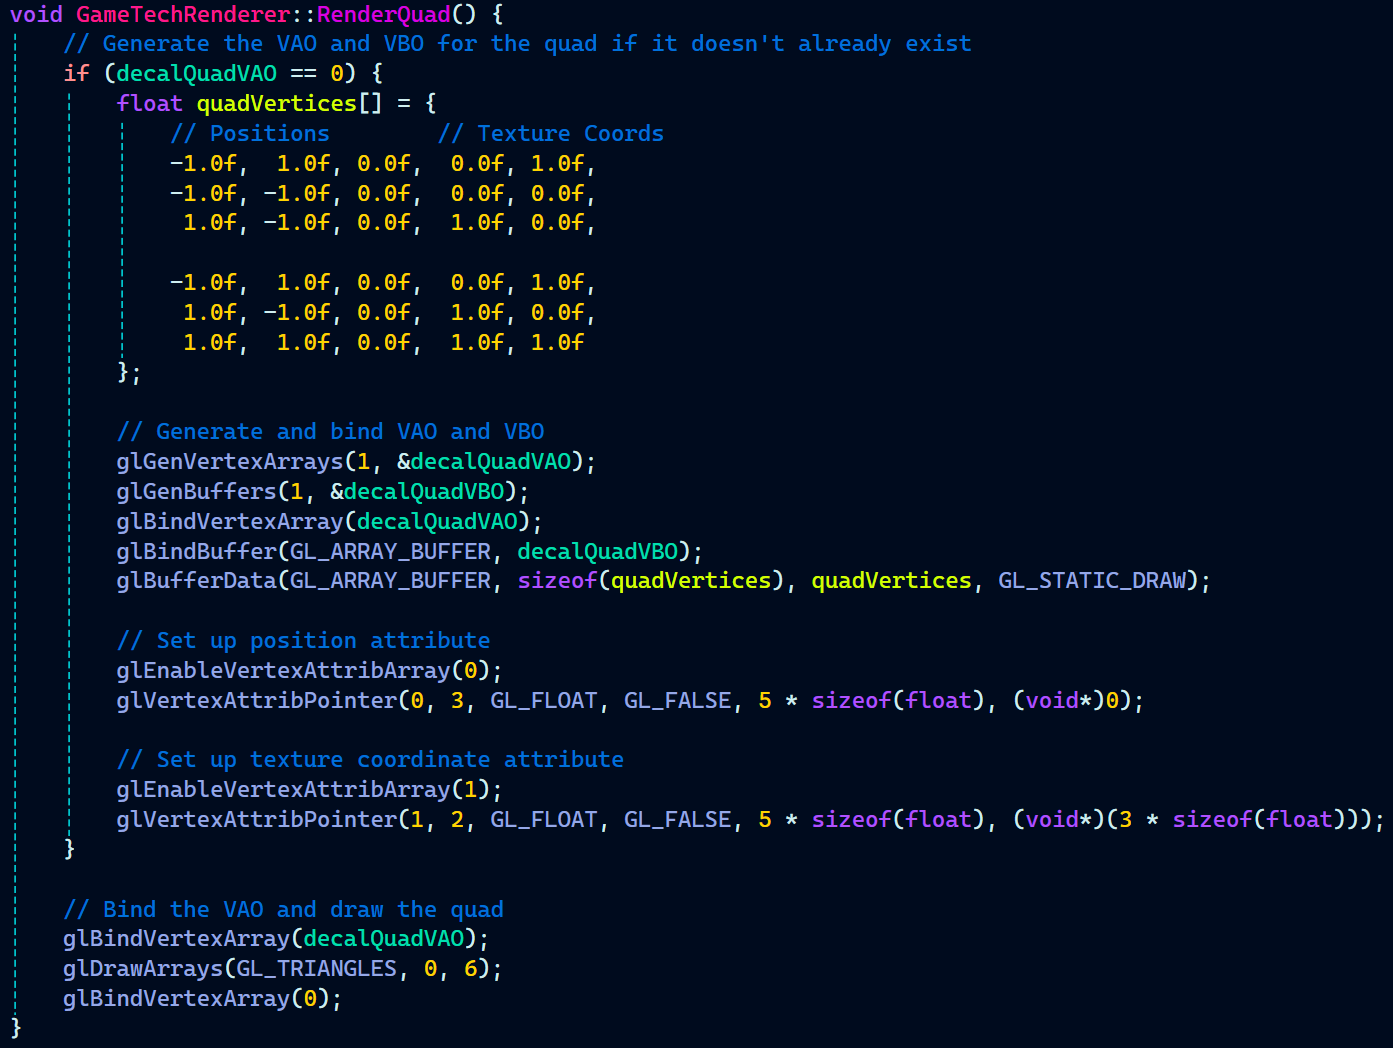
On the C++ side of things, the last thing left for decal rendering is to have a look at what RenderQuad function includes.
It generates a fullscreen quad and a VBO for it. Bind the VAO to the VBO. Then, set up position and texture coordinates attribute for the vertex shader.
Finally, bind the quad VAO and draw it.
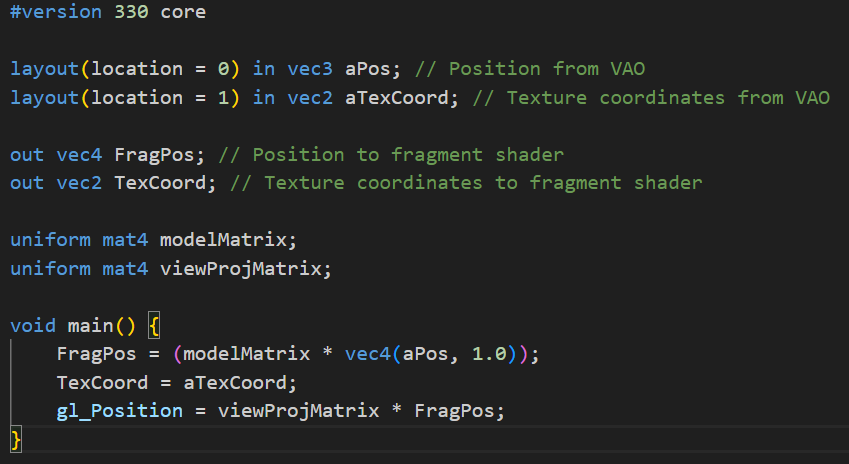
Moving on to the shader part, the first step is drawing the quad, and that’s handled by decal.vert.
This vertex shader takes in the position and texture coordinates provided by the RenderQuad() function. It also receives the model matrix and view-projection matrix, which are passed from the RenderDecals() function.
The vertex shader outputs the fragment’s world position and texture coordinates, both of which are essential for the depth testing and clipping done later in the fragment shader.
As for the main function, it’s quite small. It converts the vertex position from local space to world space and stores it in the FragPos variable. Similarly, texture coordinates are stored in TexCoord variable to be sent out to the fragment shader. As for gl_Position, it transforms the vertex position from world space to clip space by multiplying FragPos with viewProjMatrix, ensuring that the vertex is correctly projected onto the screen.
decal.vert:
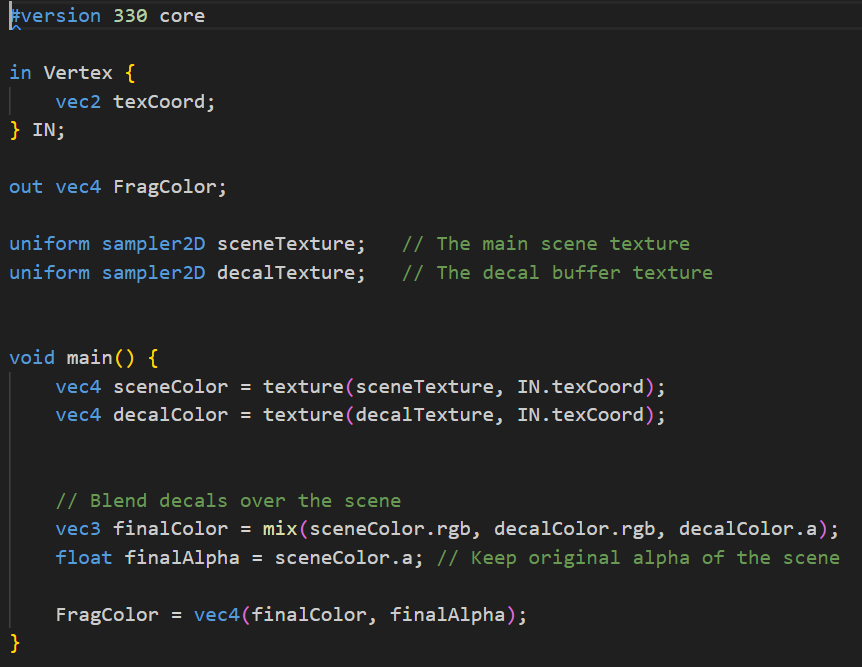
Finally, we move to the fragment shader, where all the decal-related processing happens.
It takes in FragPos and TexCoord from the vertex shader and outputs FragColor.
Some uniform variables were passed from RenderDecals() to the shader, so let’s go over them. The uniforms include decal texture, depth texture, alpha fade, decal color, screen width, and screen height.
Additionally, there are near plane and far plane variables. These are needed to convert non-linear depth values to linear depth values, since they come from different sources: the depth texture and gl_FragCoord.z. Depth values in the depth buffer are non-linear due to the perspective divide in the projection matrix.
With all the necessary variables in place, I created a LinearizeDepth() function to convert non-linear depth values to linear depth values.
Now, onto the main function. The first step is to sample the color from the decal texture. Next, I sample the depth values from the depth texture, but before doing so, I convert screen-space coordinates to the UV range [0,1] and store it in screenTexCoords. This allows me to sample the depth values from the depth texture’s red channel.
At this point, I have the scene depth value. Now, I need the decal depth value, which is taken from the z-coordinate of the decal fragment.
With both depth values acquired, I linearize them using the LinearizeDepth() function.
Next is decal clipping. A depth test is performed between the scene depth value and the decal fragment depth value. Fragments that fail the depth test are discarded, ensuring that decals do not appear on surfaces where they shouldn’t.
decal.frag:
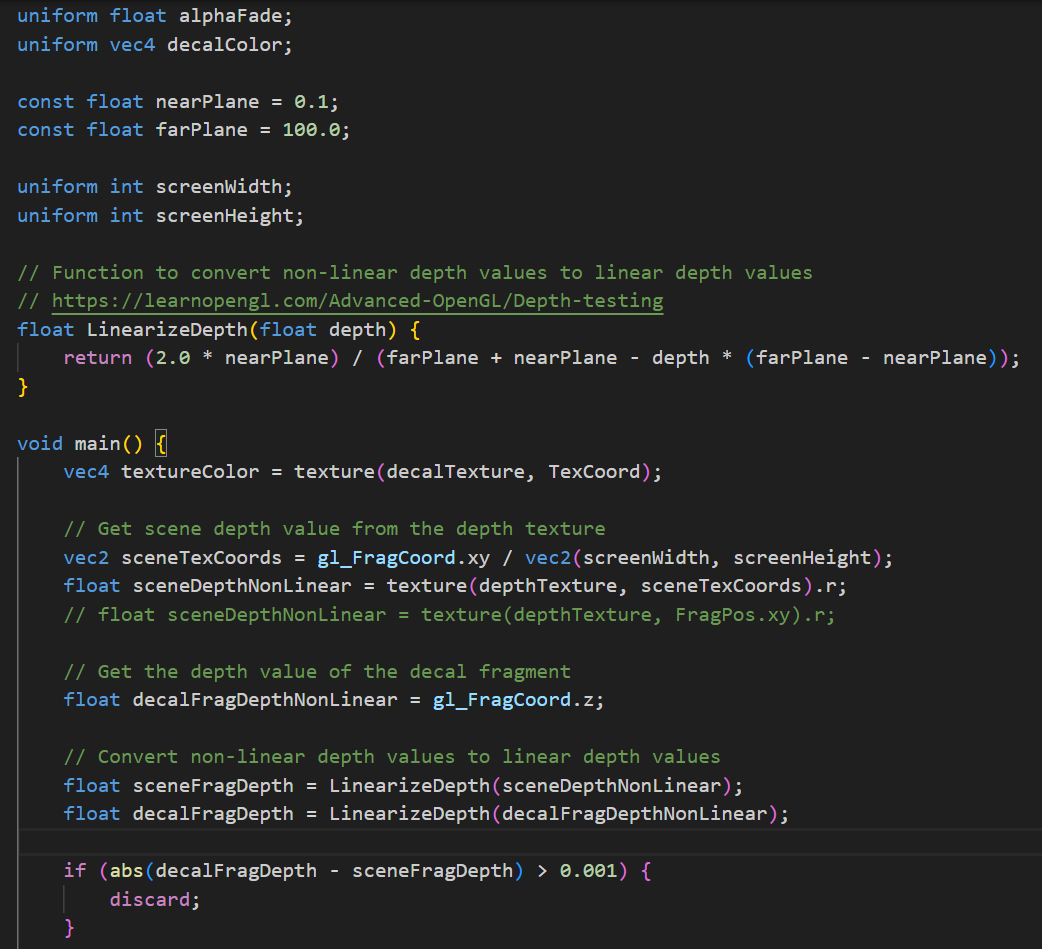
While not strictly necessary, fragments are also discarded based on their transparency. Since decals fade over time, any fragment with an alpha value below 0.1 is discarded to optimize rendering.
Next, a couple of modifications are applied to the decals. The decal color is set using the Vector4 value of decalColor, and the alpha value is reduced over time using alphaFade, making the decals fade out gradually.
Finally, in the main function, the FragColor is output, completing the decal rendering process.

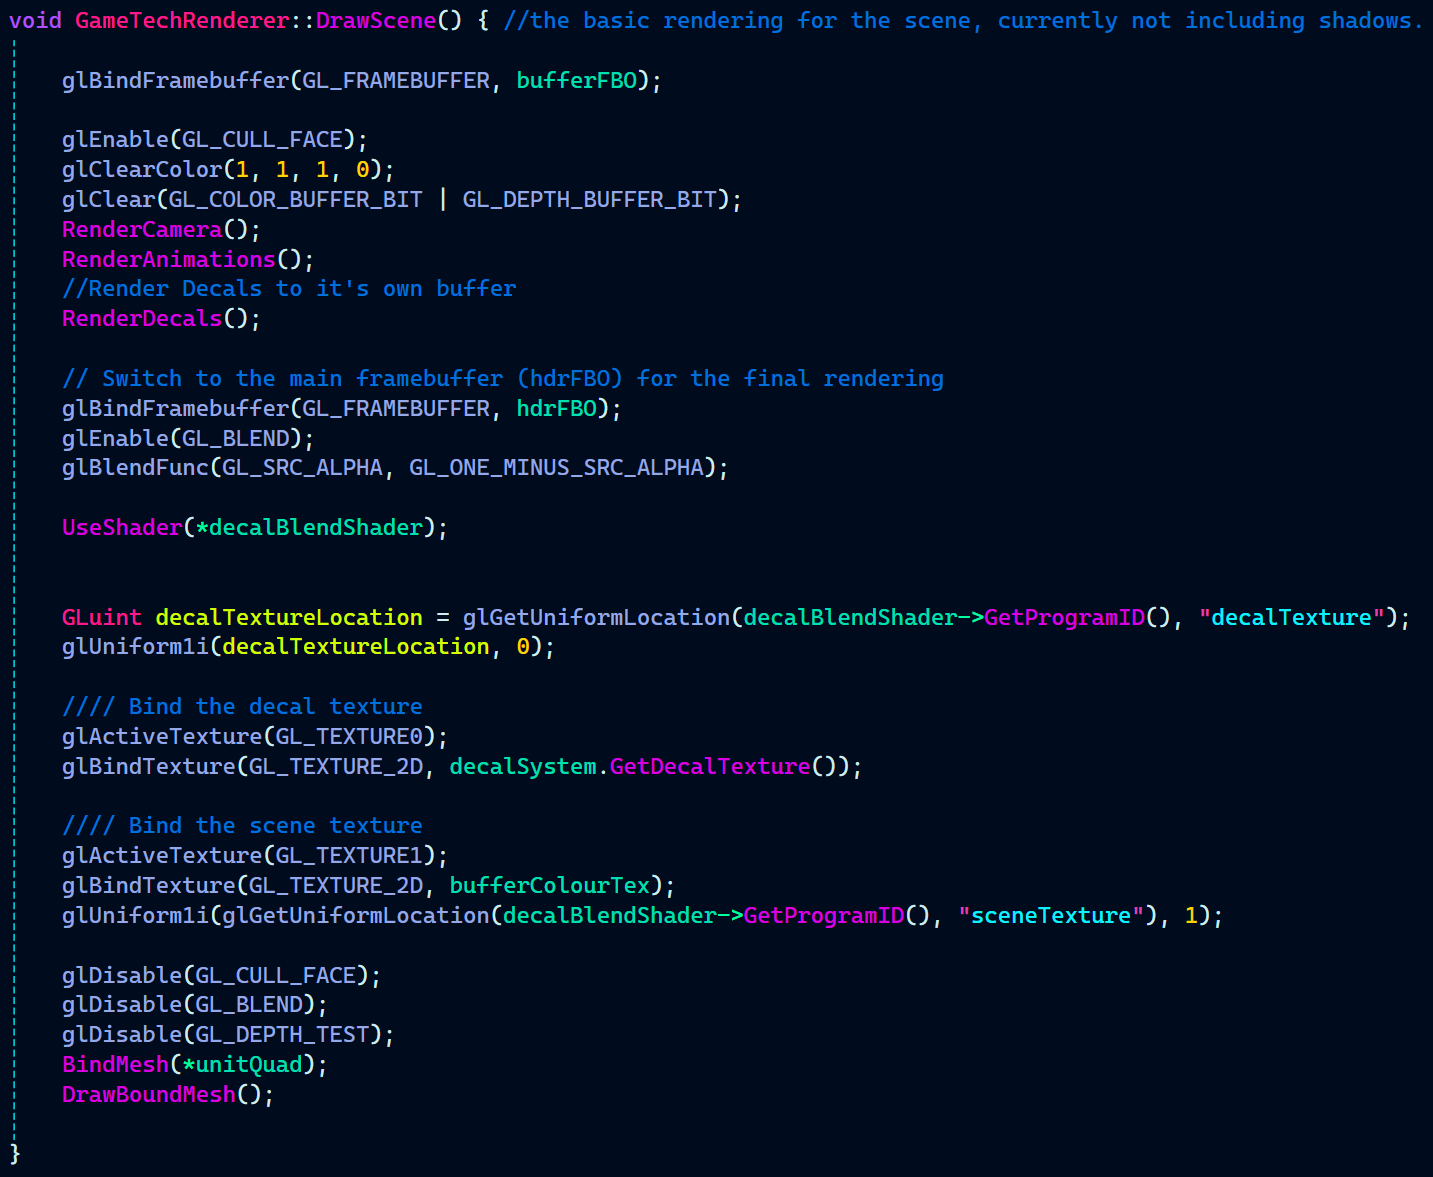
After rendering the decals separately in RenderDecals(), they need to be blended onto the main scene. This blending happens inside DrawScene() after switching to the hdrFBO.
Blending is enabled using glEnable(GL_BLEND) with the blend function glBlendFunc(GL_SRC_ALPHA, GL_ONE_MINUS_SRC_ALPHA). This ensures decals blend smoothly with the scene based on their alpha values.
GameTechRenderer.cpp:
Now onto the shaders again. texturevert.glsl is responsible for setting up the vertex positions and texture coordinates for the fullscreen quad used in the decal blending pass.
It takes in the vertex position and texture coordinates from the VAO. The position is directly assigned to gl_Position, meaning the quad will cover the entire screen. The texture coordinates are passed to the fragment shader through an output struct, ensuring the correct mapping of the scene and decal textures in decalBlend.frag.
Since this shader only handles a simple fullscreen quad, it does not require a view-projection matrix or any transformations. Its primary role is to ensure the correct texture coordinates are available for blending the decals with the scene.
texturevert.glsl:

In decalBlend.frag, the scene texture and decal texture are sampled separately. The mix() function is then used to blend the decal color with the scene color, weighted by the decal’s alpha value. This allows decals to appear naturally integrated with the environment while preserving scene details.
Finally, depth testing and face culling are disabled before drawing a fullscreen quad to apply the blended result.
decalBlend.frag:
Now that the entire decal rendering system is in place, let’s see where the decals are being applied.
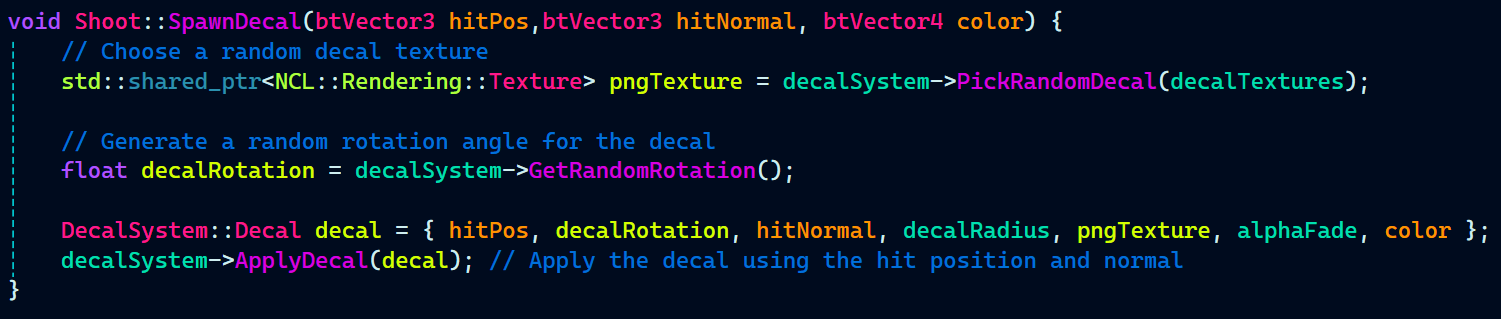
The ApplyDecal function, which adds decals to the Decal vector array, is called within the SpawnDecal function in Shoot.cpp.
The first thing it does is choose a random decal texture from the available options using the PickRandomDecal function.
Then, it generates a random rotation angle for the decal using GetRandomRotation.
After that, a Decal struct is created with all the necessary parameters like the hit position, normal, texture, rotation, and color, and finally, ApplyDecal is called to add the decal to the system.
Material System
We already had support for rendering a mesh, texture and normal for the game object. But, we did not have any support for the game object’s mesh to have other material properties like specularity and glossiness.
So, I started working on the the material system. Just as I did previously for physics and decals to have all it’s related code in PhysicsObject and DecalSystem, similarly, all the code related to material system will be in RenderObject.
In RenderObject.h, a constructor already exist that takes in a game object, mesh, texture and normal. Similarly, for the mesh to have material, I implemented another constructor that takes in a game object, mesh, and material.
Next up in RenderObject.h, are some getter functions that returns mesh, colour, and the material. These getter functions will be use in GameTechRenderer where all the rendering stuff is handled to retrieve and set the uniforms for the shader.
RenderObject.h:
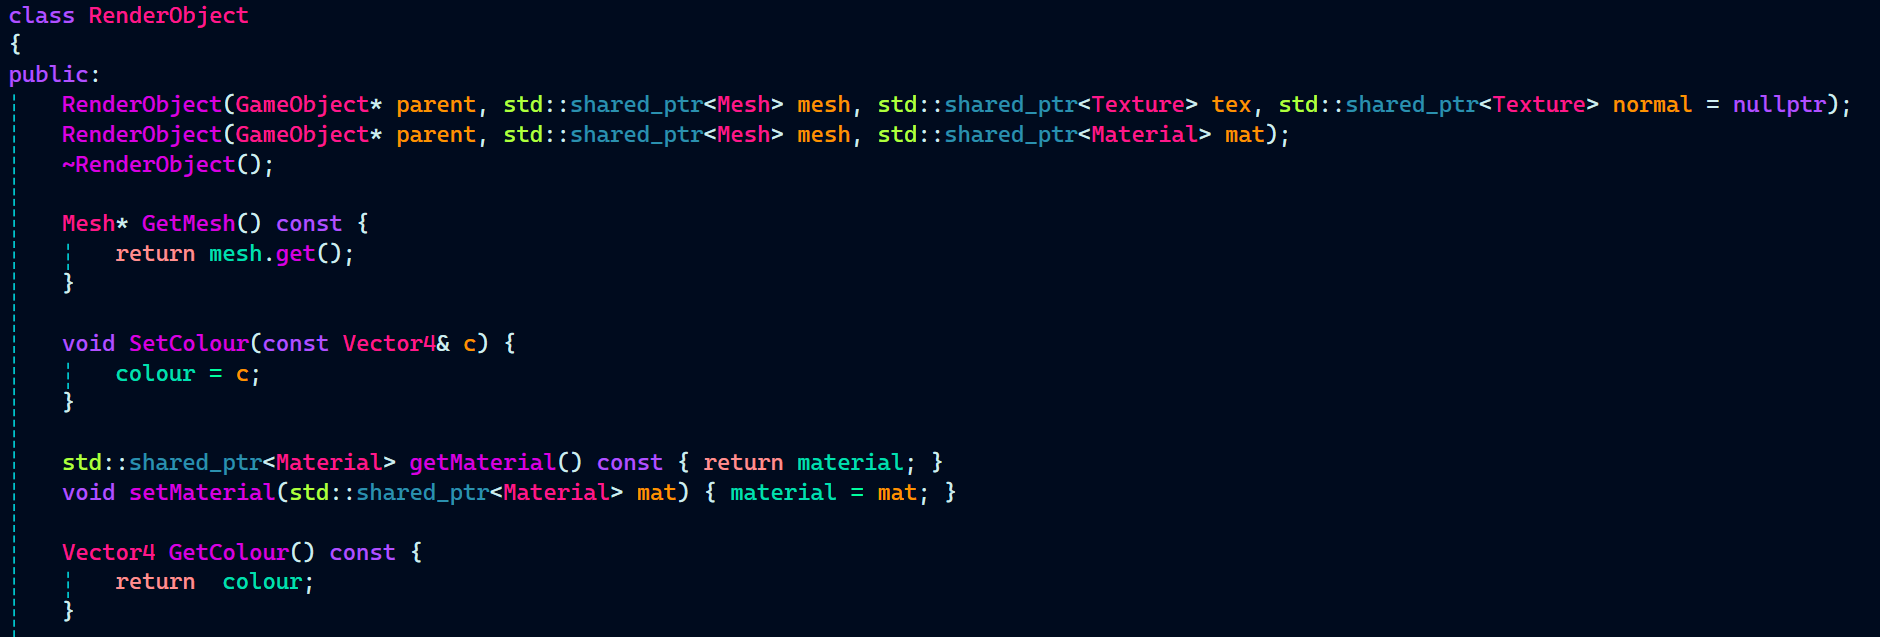
RenderObject header also defines a pointer to the Material class.

With RenderObject header completed, I implemented the second constructor I had just created. In the constructor, I initialized the member variables of the RenderObject instance and a default color.
Additionally, I made a small adjustment to the first constructor. Since it only takes a texture and normal map instead of a full material, I created an instance of Material that accepts just a texture and normal map.
RenderObject.cpp:

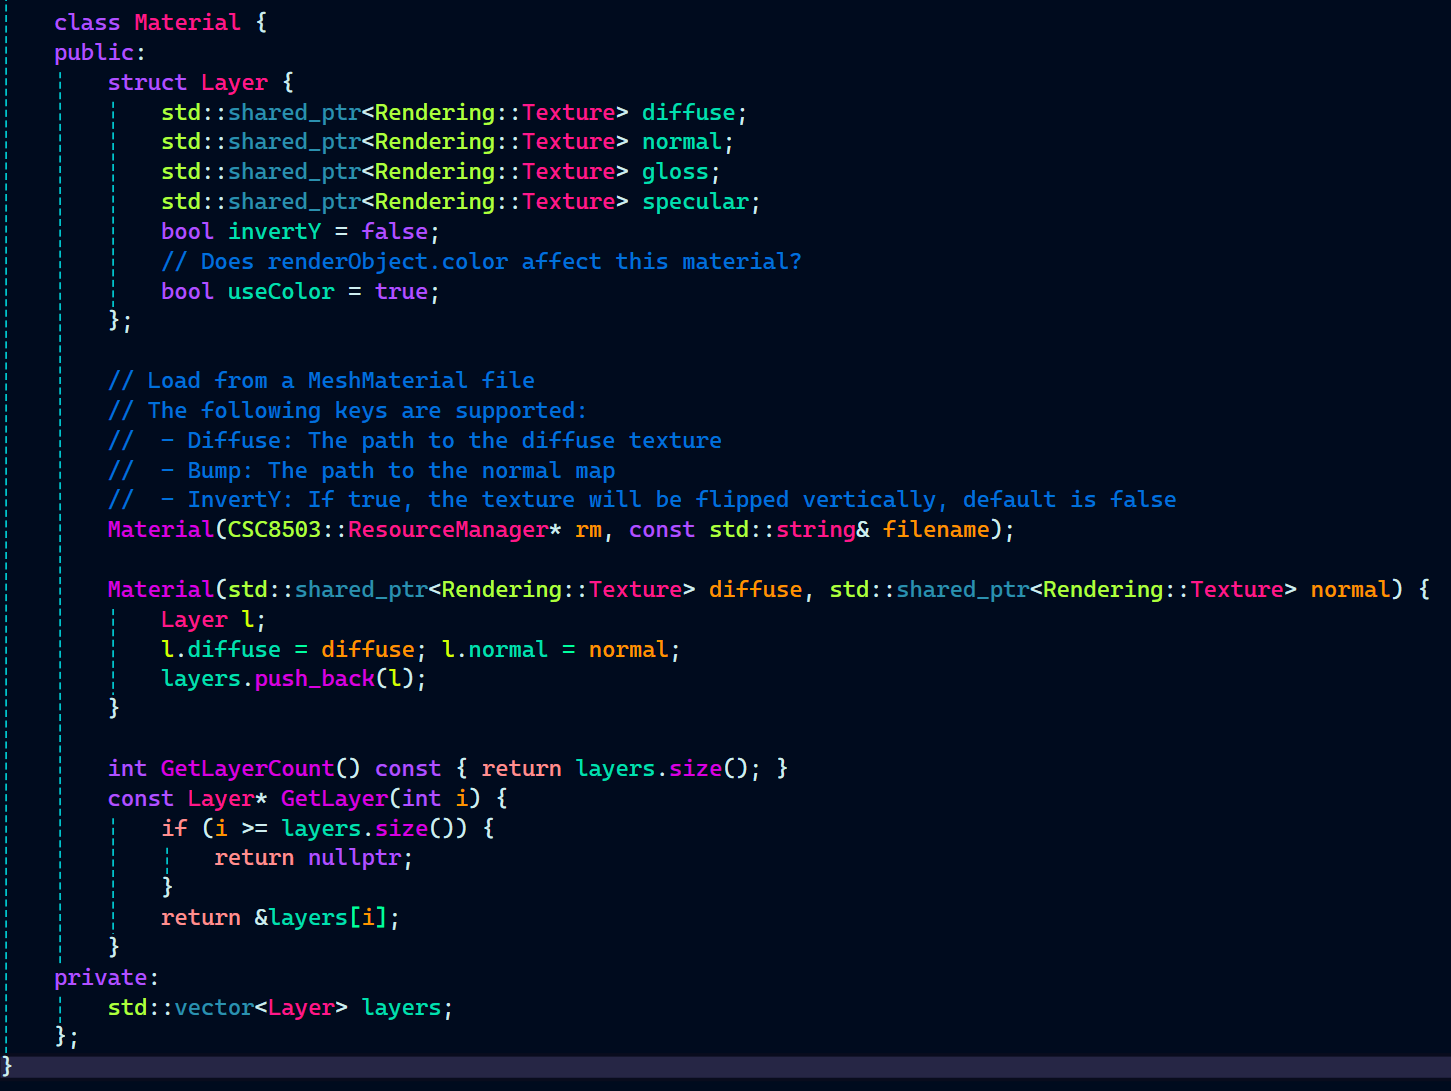
This also required a slight change to be made in the Material.h which required creating another constructor that takes in diffuse and normal textures. A layer’s diffuse and normal textures are initialized in the constructor and pushed in the layers vector array.
Material.h:

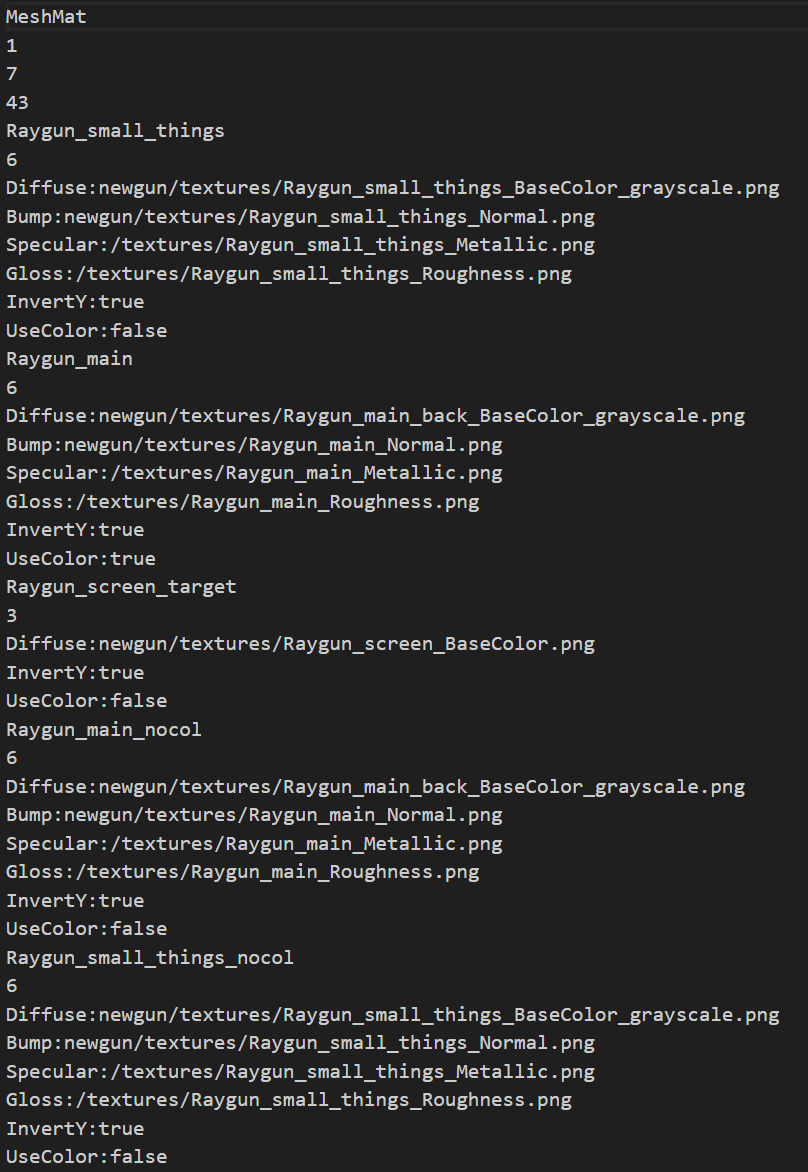
Let’s also have a look at the Material constructor. It takes in a pointer to the ResourceManager and a string for the material file name.
Inside the constructor, it creates an instance of MeshMaterial and passes the file name string to it.
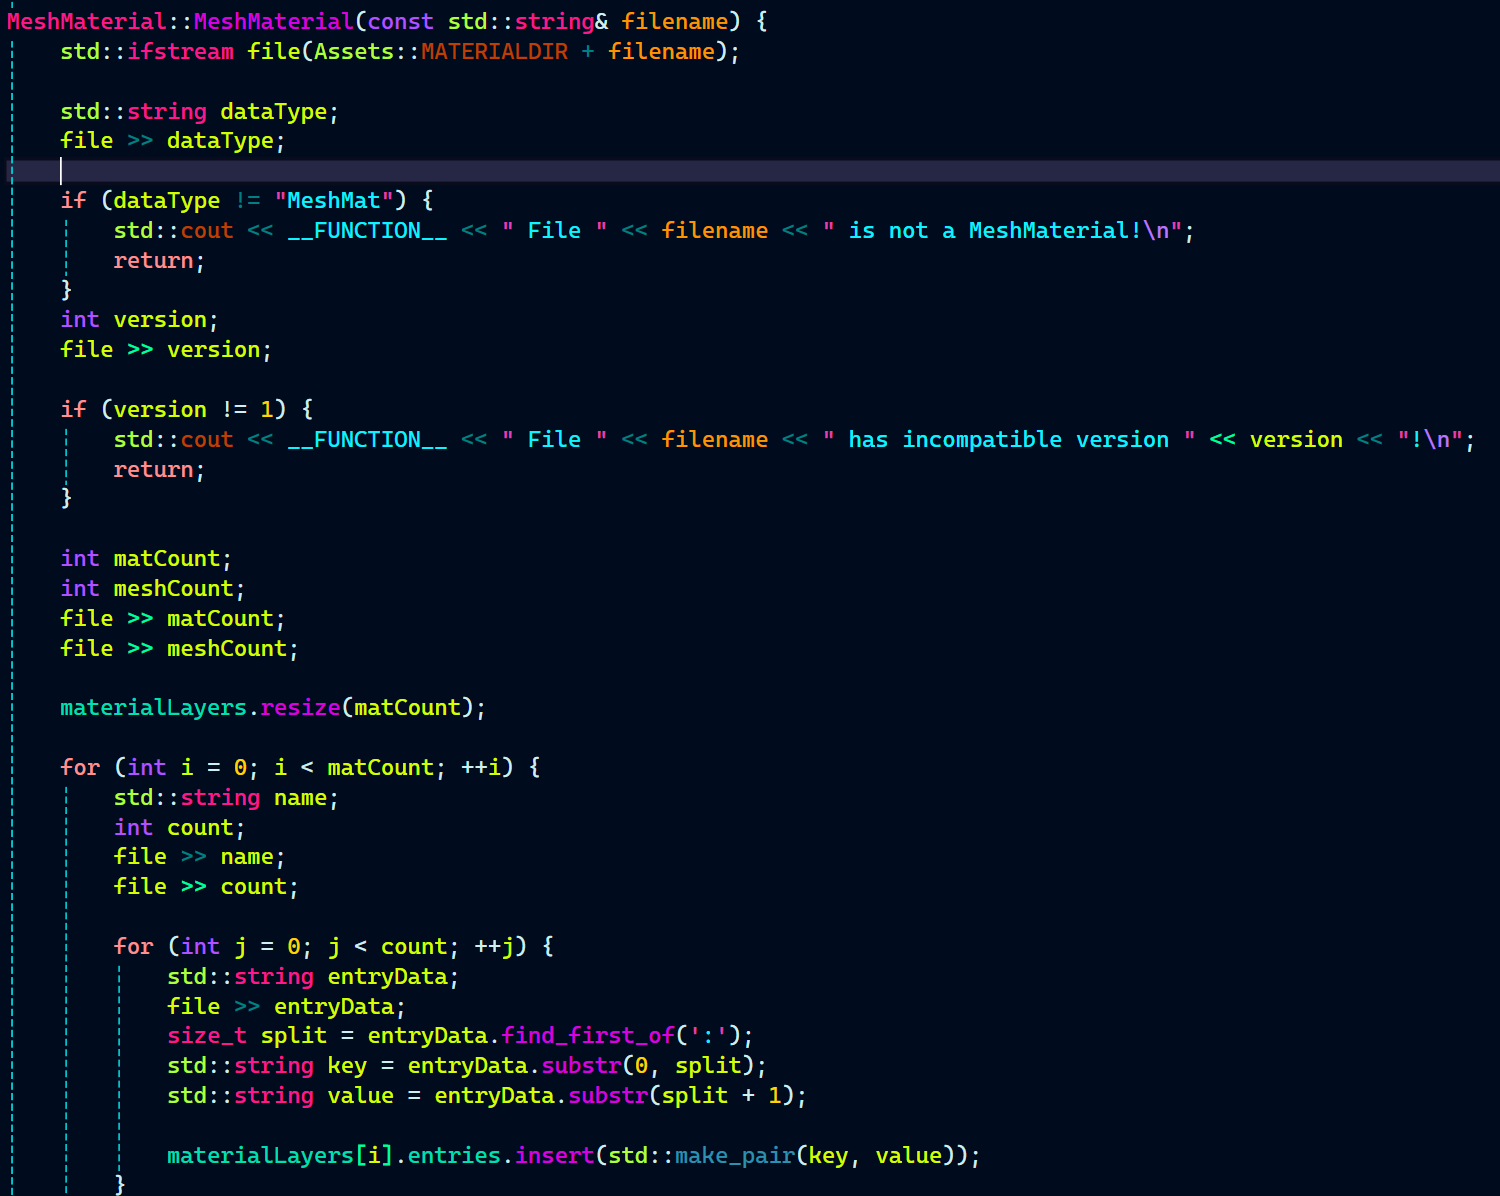
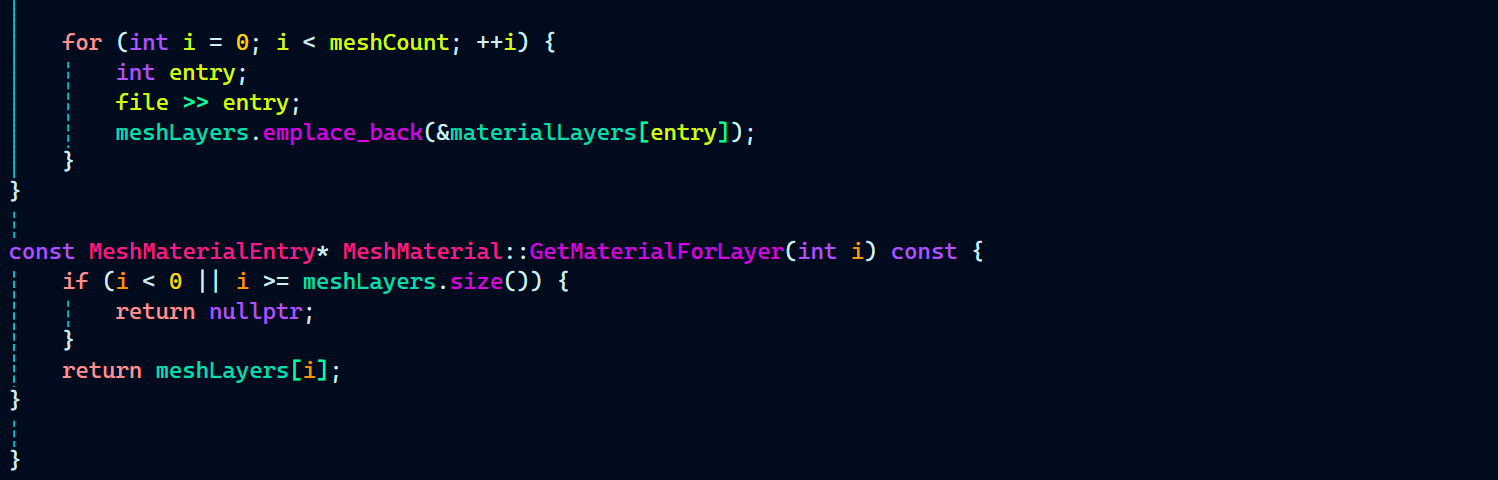
Before going further in Material constructor, let’s have a look at what MeshMaterial constructor does. MeshMaterial constructor is responsible for reading and parsing the MeshMaterial file. There’s also another function called GetMaterialForLayers which return the material for a particular layer.
MeshMaterial.cpp:
The Material constructor loads a material file using MeshMaterial, then loops through all its layers. For each layer, it creates a Layer struct and checks for texture entries like diffuse, normal (bump), specular, and gloss. If found, it loads the textures using the ResourceManager.
It also checks for flags like InvertY and UseColor and sets them accordingly. Each fully setup layer is then pushed into the layers vector. This makes the material flexible and configurable based on the file data.
Material.cpp:
Now, It’s time to get back to GameTechRenderer. Since, the rendering pipeline is based on deferred rendering, gloss and specular needs to be on their own buffer.
GameTechRenderer.h:
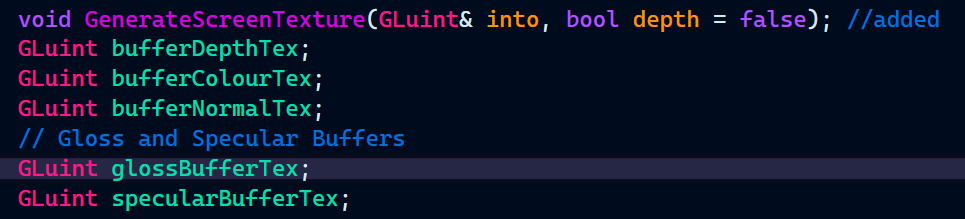
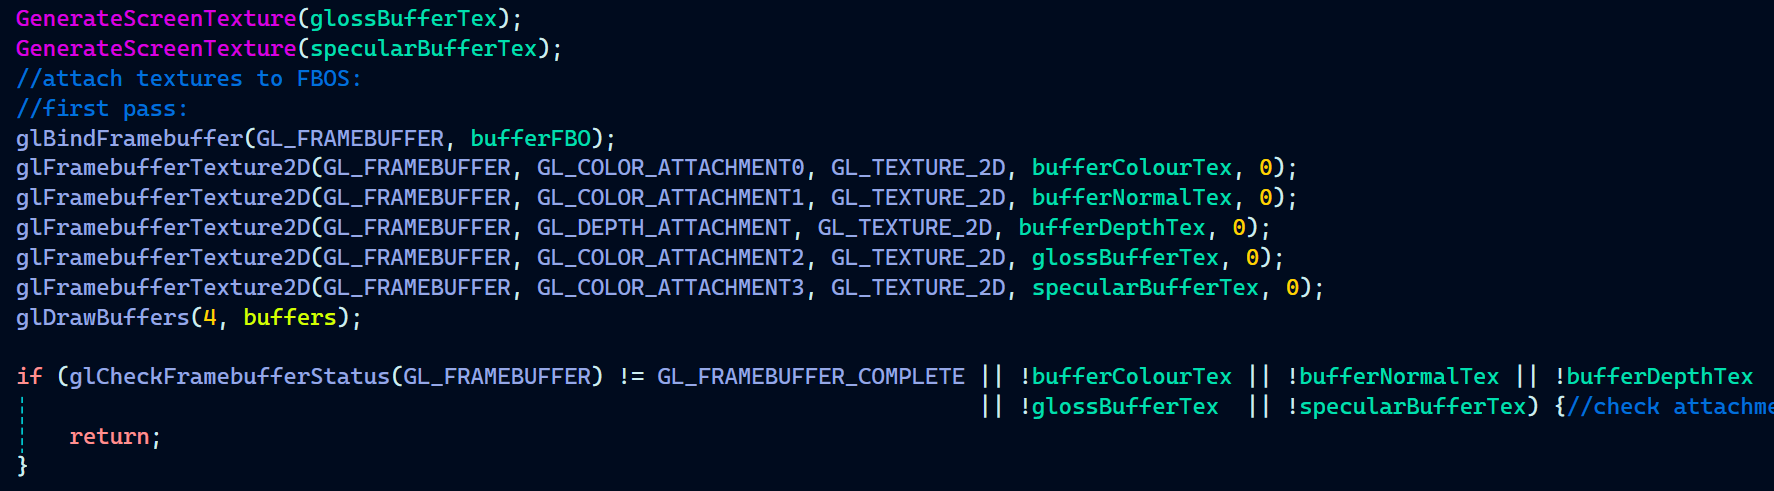
Now, in GameTechRenderer.cpp, I generated the screen textures for the gloss and specular buffers and binding them to the FBO.
GameTechRenderer.cpp:
Now it’s time to send uniforms to the shader and bind the necessary textures before rendering each object.
First, I enabled depth testing and send the camera’s view, projection, and position to the shader. Then for each object in the scene calculate its model matrix and apply render scaling.
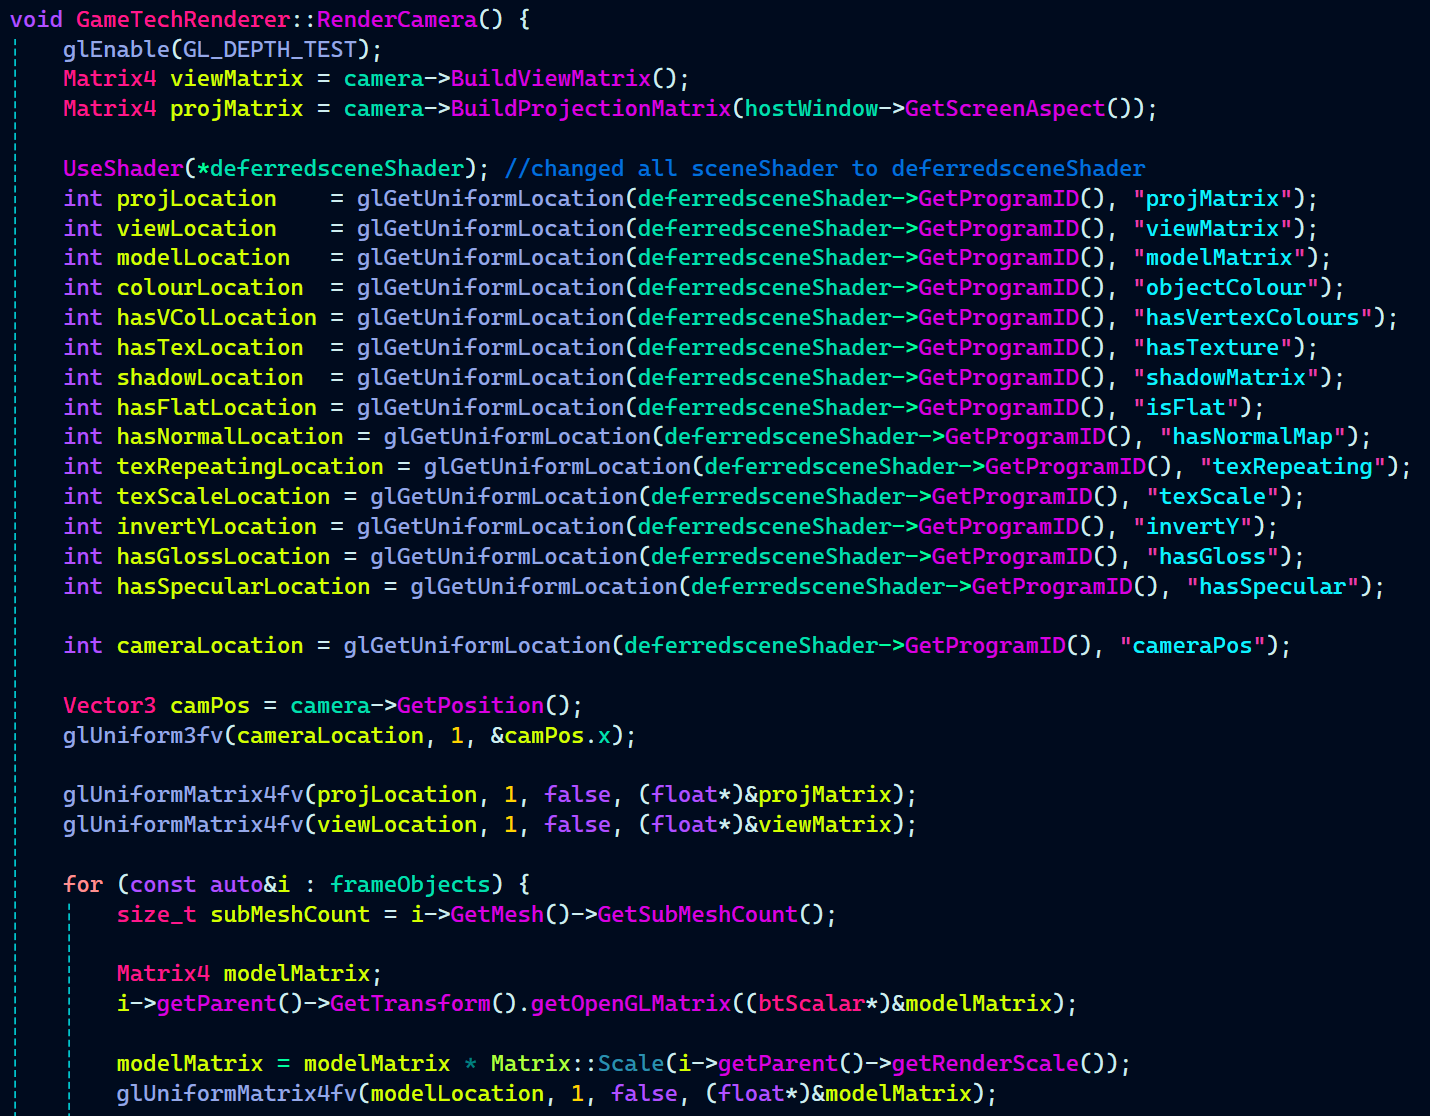
For the textures to render correctly on the mesh, I also looped through all the submeshes and bound the appropriate textures for each one individually.
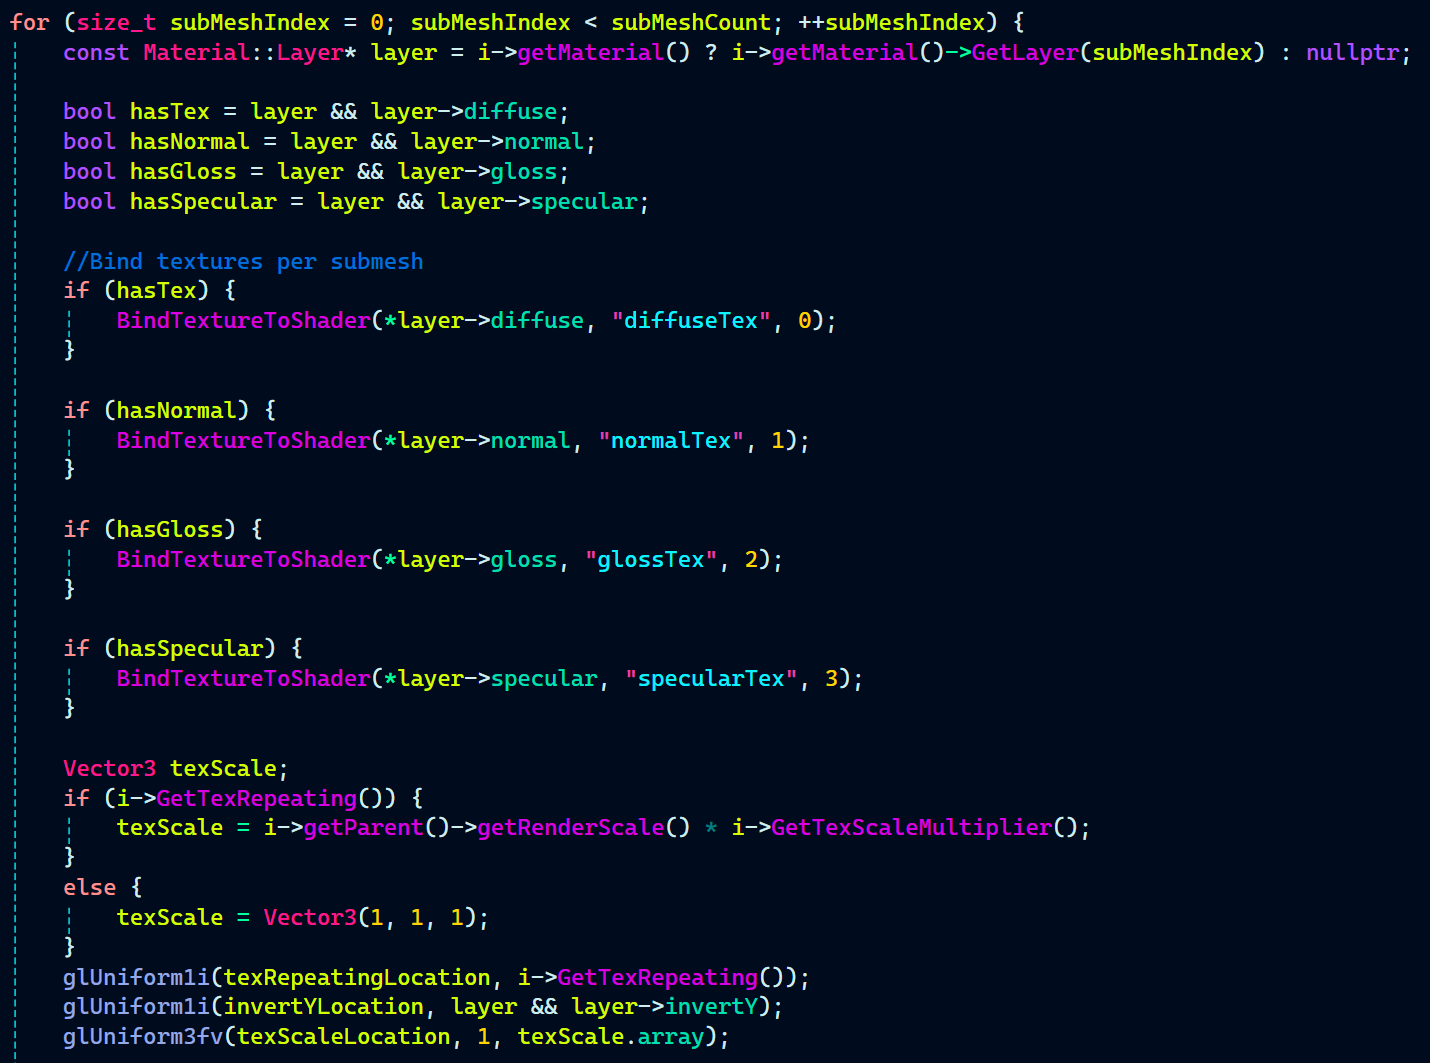
Let’s have a look at all the stuff that happens inside the loop:
We get the material layer and check which textures (diffuse, normal, gloss, specular) are available.
Available textures are bound to specific slots.
Texture scale is set based on whether repeating is enabled.
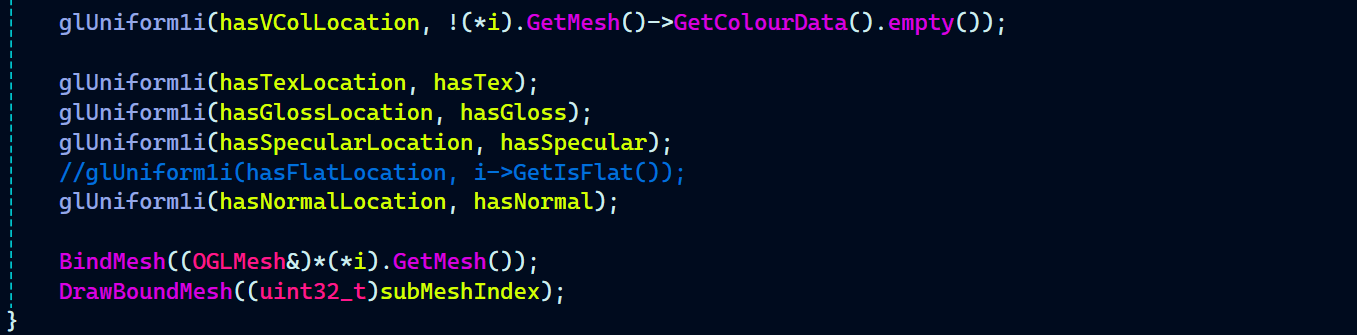
We send various flags to the shader like
hasTex,invertY,hasNormal, etc.The object’s color is set based on whether the material uses color.
Finally, we bind and draw the mesh.
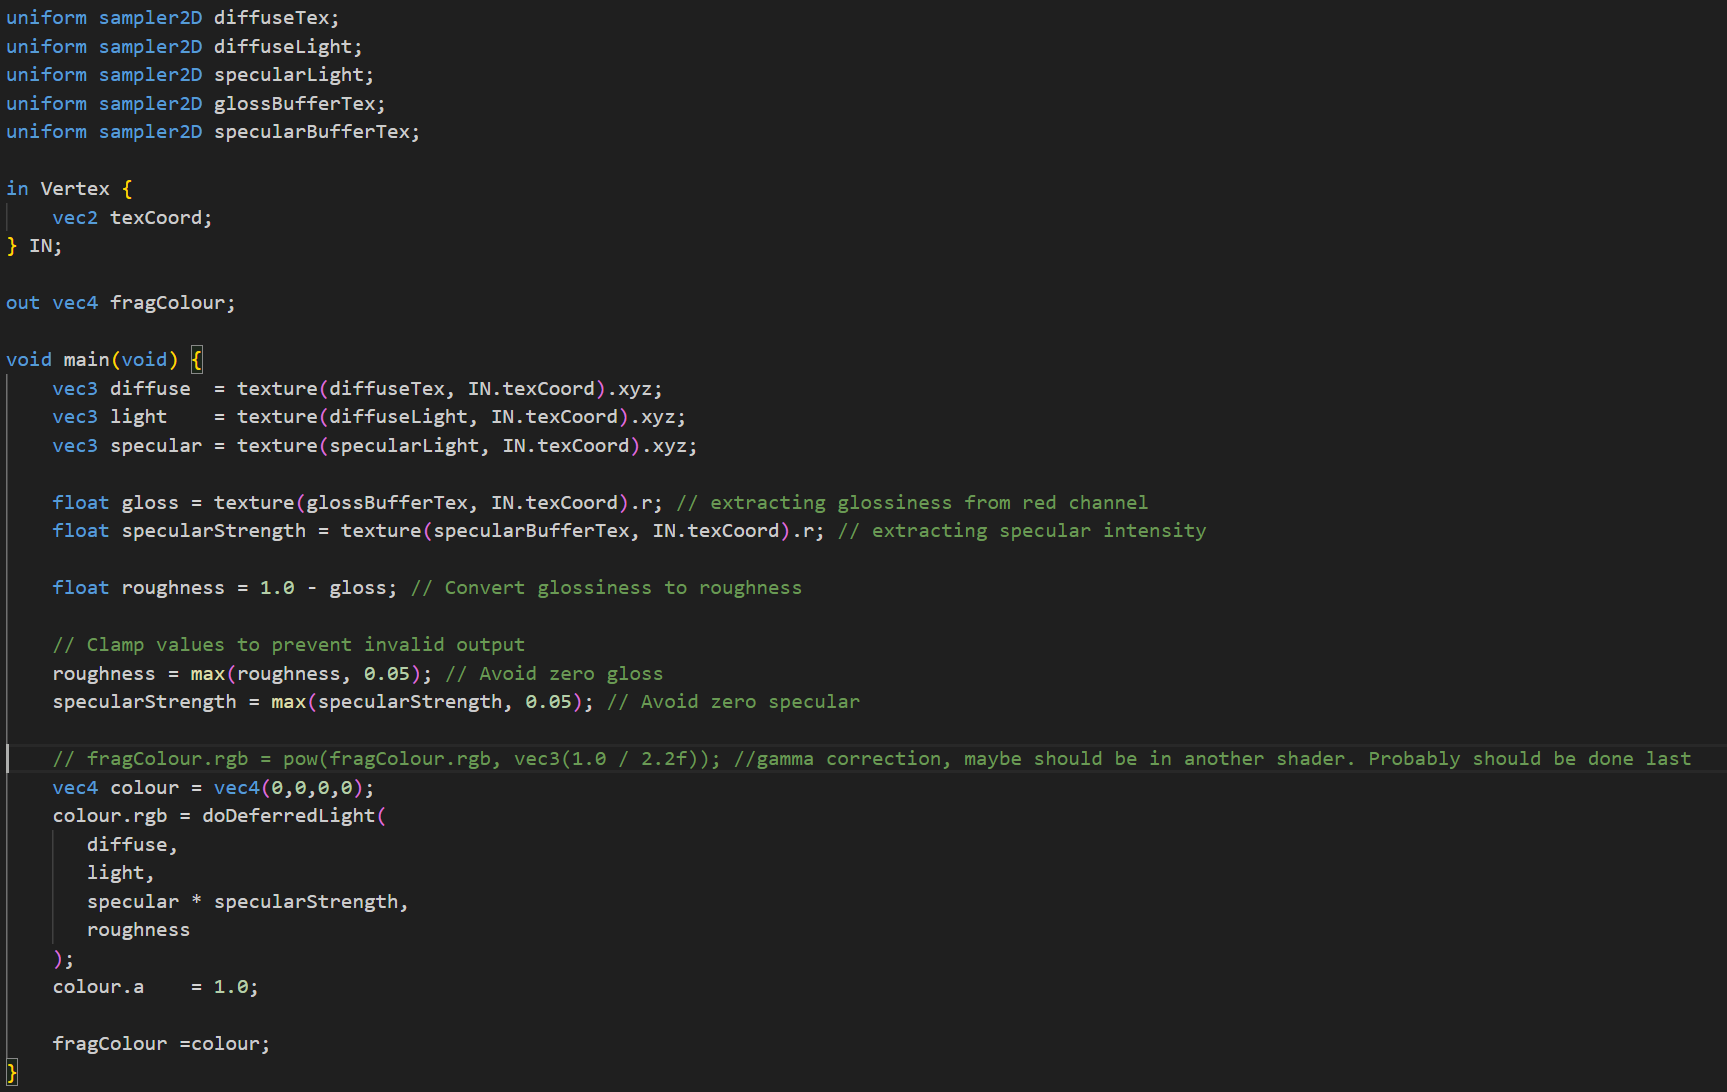
First up in deferred scene frag we have the uniform shaders.
Note: Both the following shaders are written by the graphics programmer Max Davidson. I only wrote the code related to the rendering of textures extracted from the materials.
deferredscenefrag.glsl:

With that the material rendering part of the C++ is wrapped up.
It’s time to modify the existing shaders used for deferred rendering for the texture, normal, specular, and gloss map to work.
The first pass for the deferred rendering is handled by deferredscenefrag.glsl.
This shader handles deferred lighting by blending diffuse, specular, and gloss data. It samples textures for diffuse color, lighting, and specular highlights.
Glossiness is extracted from the red channel of the gloss buffer and converted to roughness. Specular intensity is also taken from the red channel of the specular buffer.
Both values are clamped to prevent invalid outputs.
The final color is calculated using the doDeferredLight function and assigned to fragColour with full alpha.

Now for the second pass, I moved on to the combinefrag.glsl. This is where the actual lighting happens! Since the first pass already stored all material properties, the second pass now simply applies lighting without needing to render geometry again.
combinefrag.glsl:
As seen in the RenderCamera() function in the GameTechRenderer.cpp that there’s a useColour bool being used to check whether the defined color by the gameplay programmer should be set to the object or not. Here’s how I defined it in the material file:
VD_Raygun_Cartoony_Rigged1.mat:
Font Rendering
Our custom game engine only supported .fnt files, which is a bitmap font format. Since we needed a font that better suited the overall vibe of the game, I decided to integrate the FreeType library for dynamic font rendering.
FreeType also supports .ttf and .otf font formats, which is exactly what I was looking to use for our game to allow for more flexible and high-quality font rendering.
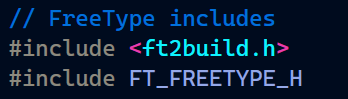
I started of by adding the FreeType library as a git submodule in the CMakeList. Then include it’s headers.
SimpleFont.cpp:
With the FreeType library included, I moved on to setting up the necessary data and functions to access those data in SimpleFont.h.
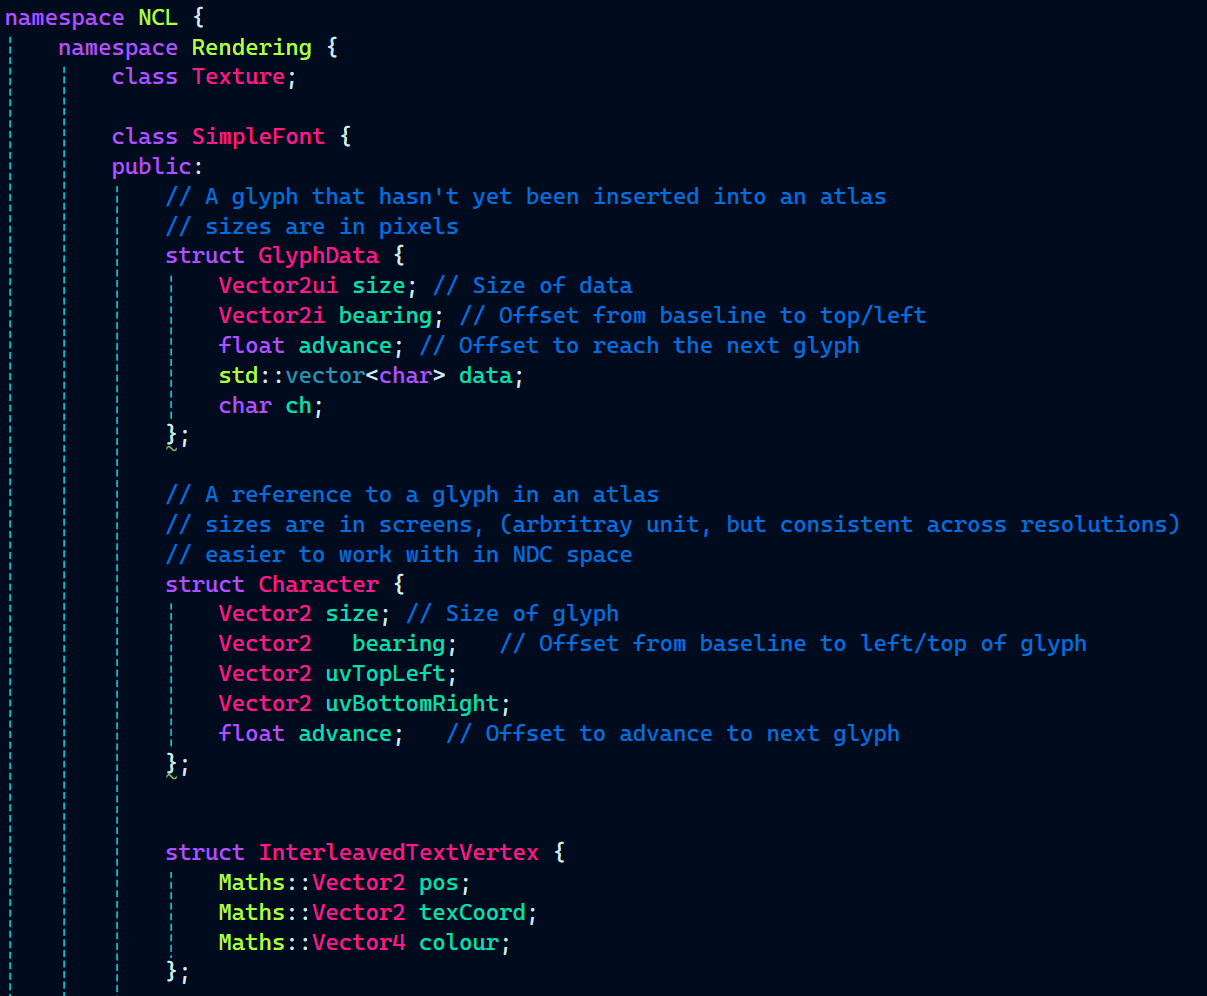
With font rendering, there’s a lot of data that needs to be managed before text can actually be displayed on screen. To handle this, I used three structs:
- GlyphData struct is used to store information about a glyph that hasn’t yet been inserted into a texture atlas. This includes its pixel size, bearing (which is the offset from the baseline), the advance value to get to the next character, the raw glyph data, and the character itself.
- Character struct represents a glyph that has already been added to the atlas. It contains the glyph’s size and bearing in screen space (which is easier to work with in normalized device coordinates), the top-left and bottom-right UV coordinates in the atlas, and the advance to position the next character.
- InterleavedTextVertex struct stores the position, texture coordinate, and color data for each vertex in a rendered string. This is useful when uploading text mesh data to the GPU for rendering.
Then, we have some utility functions that generate vertices from a given string.
BuildVerticesForString and BuildInterleavedVerticesForString take a string, position, color, and size, and fill out vertex data for rendering text—either as separate position, UV, and color arrays or as a single interleaved vertex buffer.
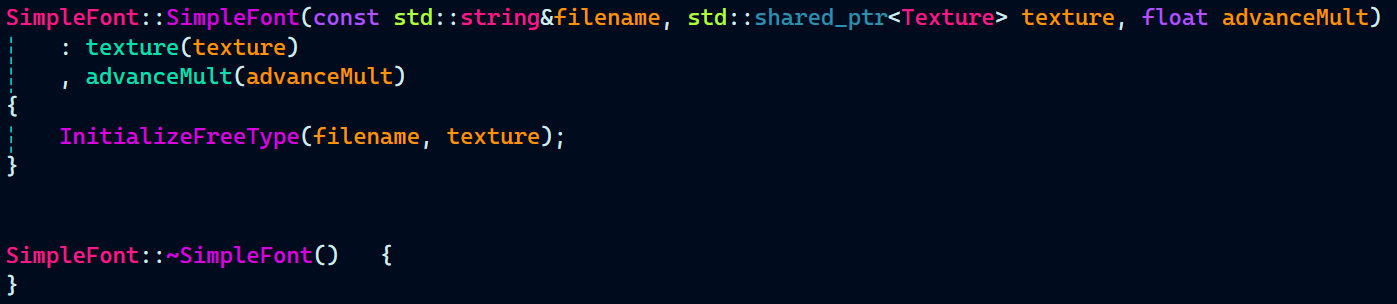
Moving on, there’s a constructor that takes a font file name, a texture to be filled with the font’s glyphs, and an advance multiplier, which controls how far the cursor moves after rendering each character.
Finally, we have two getter functions—GetCharacter returns glyph data for a given character, and getTexture provides access to the font’s texture atlas.
At the bottom of the class, there are a few constants and member variables to support rendering. ScreenSize defines the pixel resolution used for size calculations, while StartChar and EndChar set the range of supported ASCII characters. AtlasSize defines the font texture atlas layout and includes a static assertion to ensure it’s large enough.
The class also stores advanceMult for glyph spacing, a shared pointer to the font texture, and a map of characters to store the final processed glyphs for rendering.

With our SimpleFont header setup with all the data and function declaration that were required, it’s time to implement the functions and the constructor in SimpleFont.cpp.
First up, we have the SimpleFont() that initialized the member variables and passes them to the function InitializeFreeType() that will actually handle the initialization of the FreeType font library.
There’s nothing that needs to be deleted in the destructor.
SimpleFont.cpp:
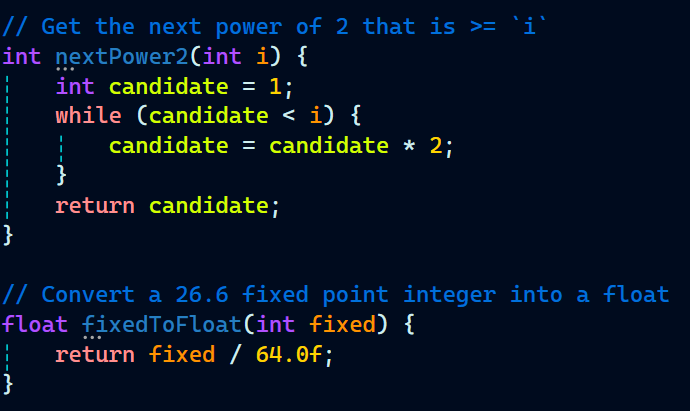
Next, there are two small utility functions:
- nextPower2(int i) returns the next power of 2 greater than or equal to the input, useful for creating texture sizes compatible with GPU requirements.
- fixedToFloat(int fixed) converts a 26.6 fixed-point integer (commonly used in font metrics) into a floating-point number for easier calculations.
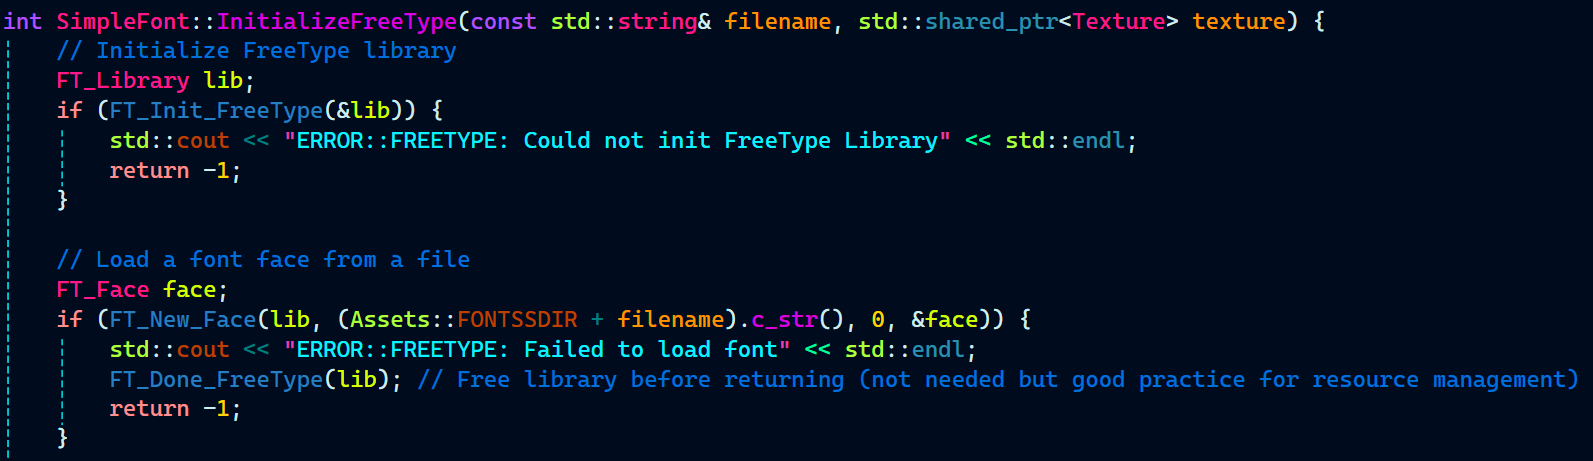
Finally, let’s look at the InitializeFreeType() function, which handles several tasks. It starts by initializing the FreeType library and loading a font face from a file.
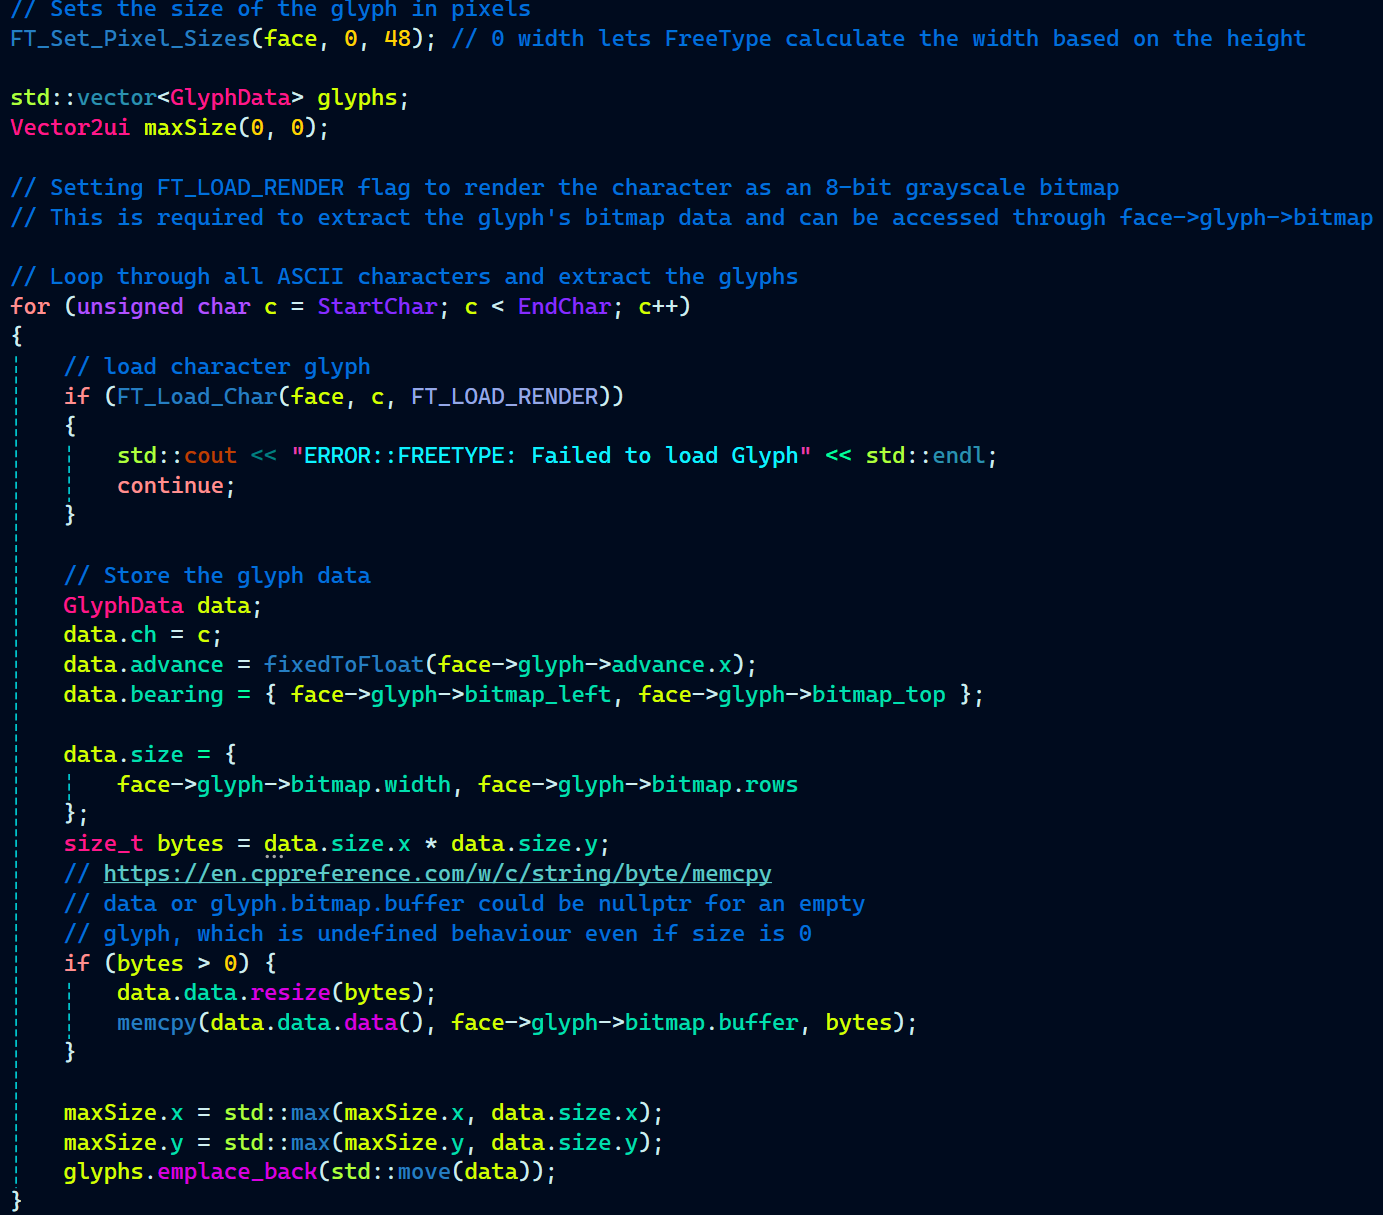
Then, it sets the size of the font’s glyphs and iterates through all ASCII characters to extract their data, including the bitmap, size, bearing, and advance. This data is stored in a GlyphData structure.
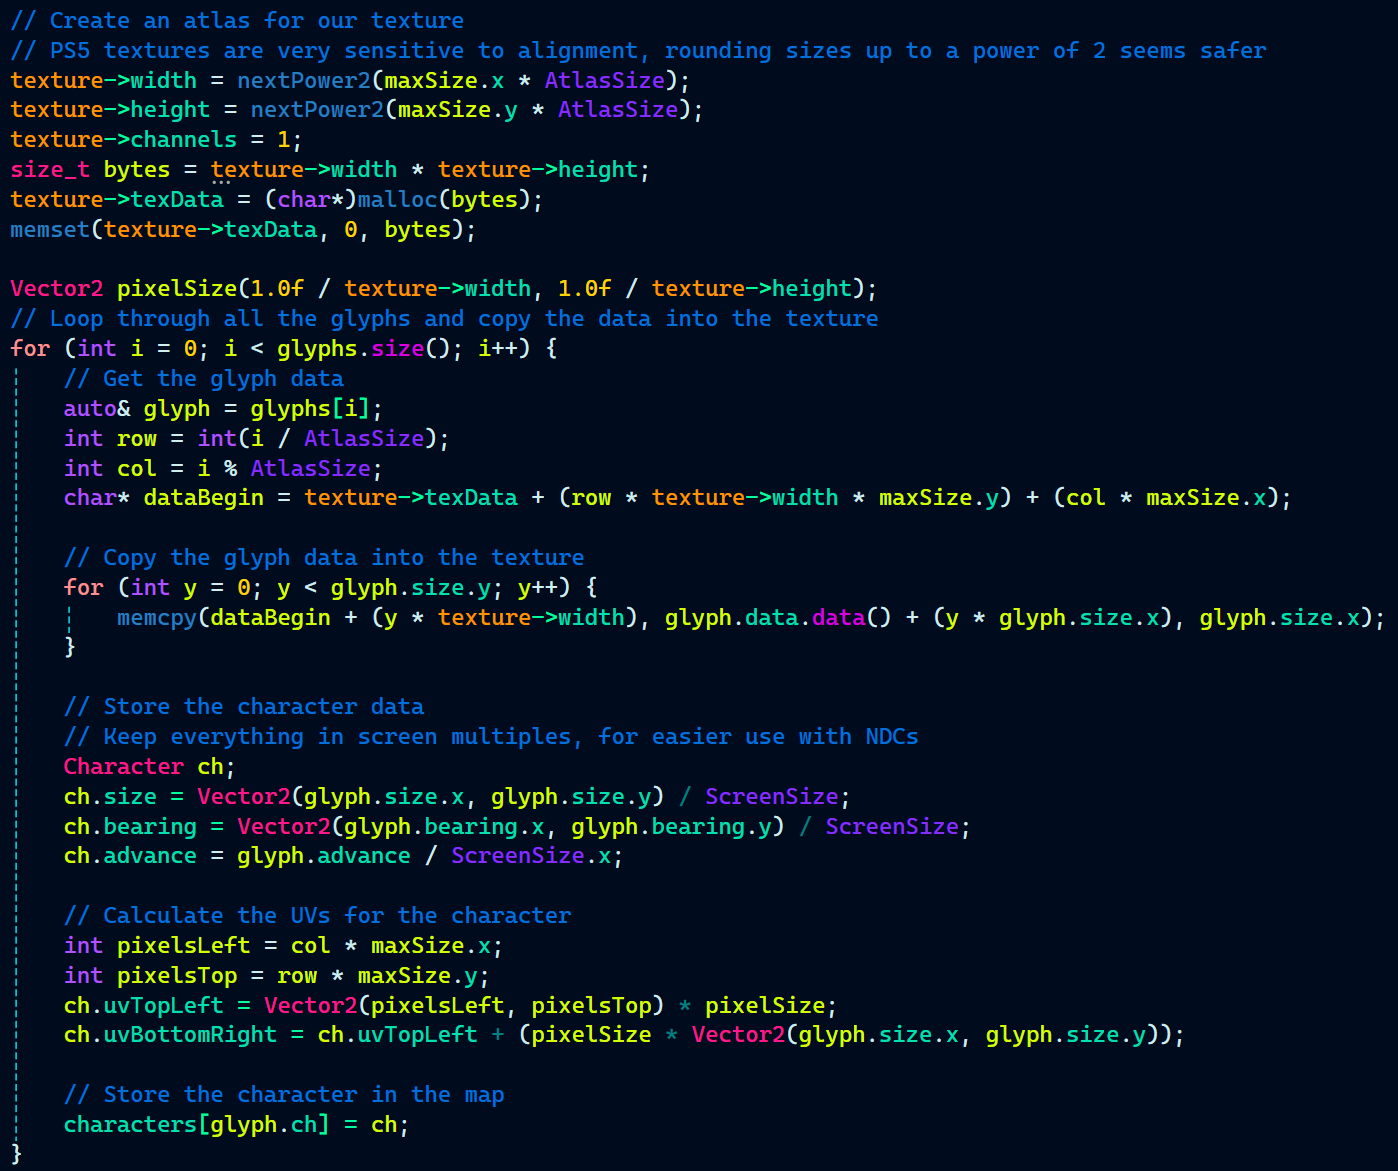
After that, it creates a texture atlas, resizing it to the next power of 2 to ensure compatibility. The glyphs’ bitmap data is copied into the texture, and UV coordinates are calculated for each character.
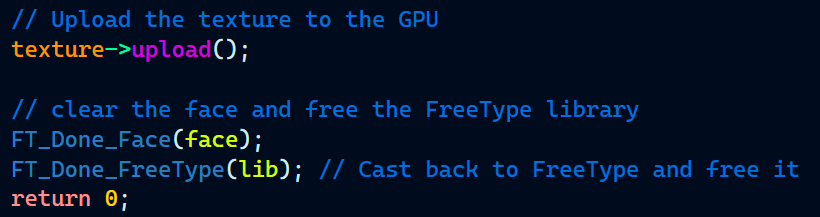
Finally, the function uploads the texture to the GPU and cleans up by freeing the FreeType resources.
That entirely wraps the whole set up for rendering the font. Now, for the rendering part, there was already a NewRenderText() function implemented there which used the rendering code that was suitable for .fnt bitmap font. But, since I was using FreeType library now with support for .ttf and .otf fonts, some modifications were required to be made to the NewRenderText() function.
The function starts by rendering the strings that need to be displayed as text. It retrieves the debug strings and checks if there are any to render.
It then binds the font texture, sets up an orthographic projection matrix for text positioning, and sends the texture to the shader.
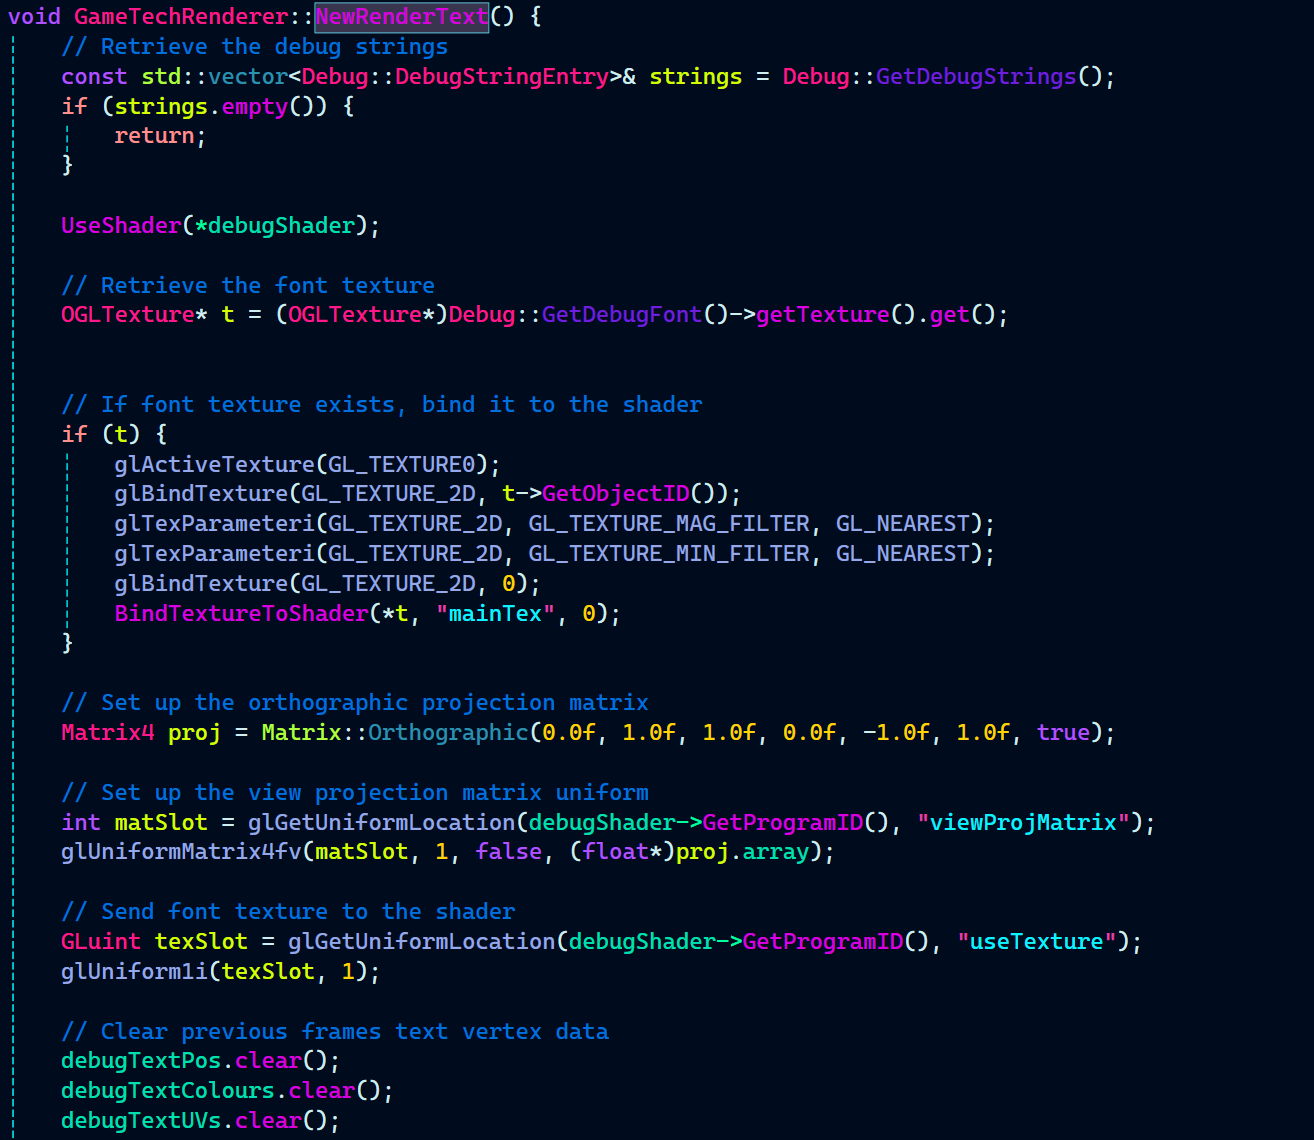
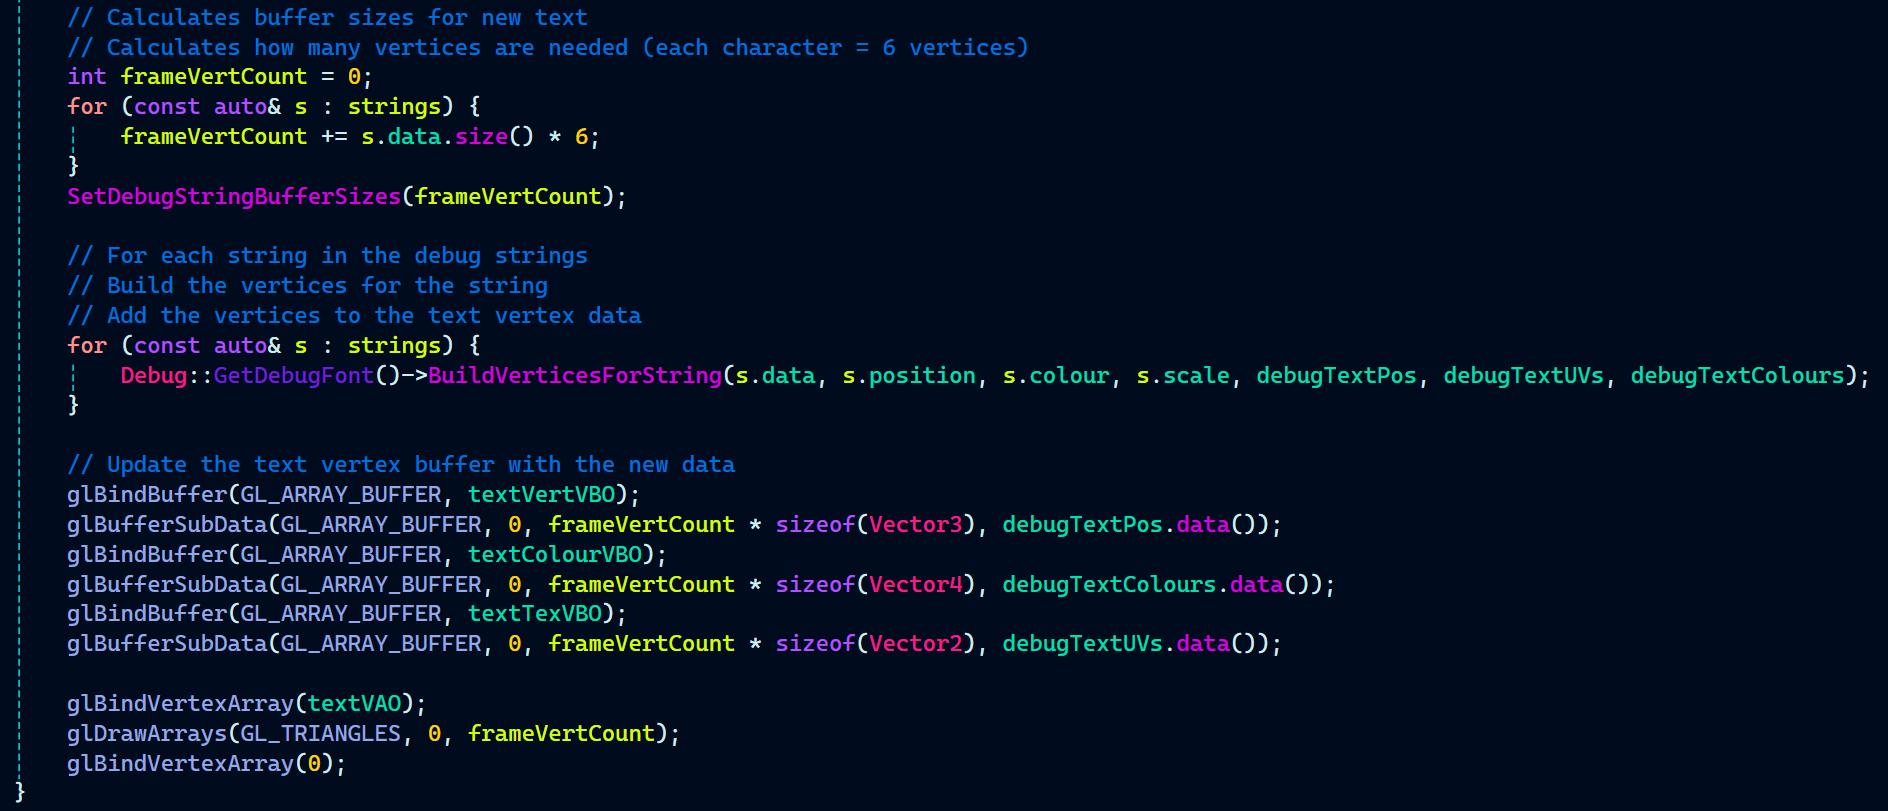
The function calculates the number of vertices needed for the text, builds the vertex data for each string, and updates the vertex buffers.
Finally, it draws the text using OpenGL’s draw calls.
On the C++ side, that’s all I did for font rendering.
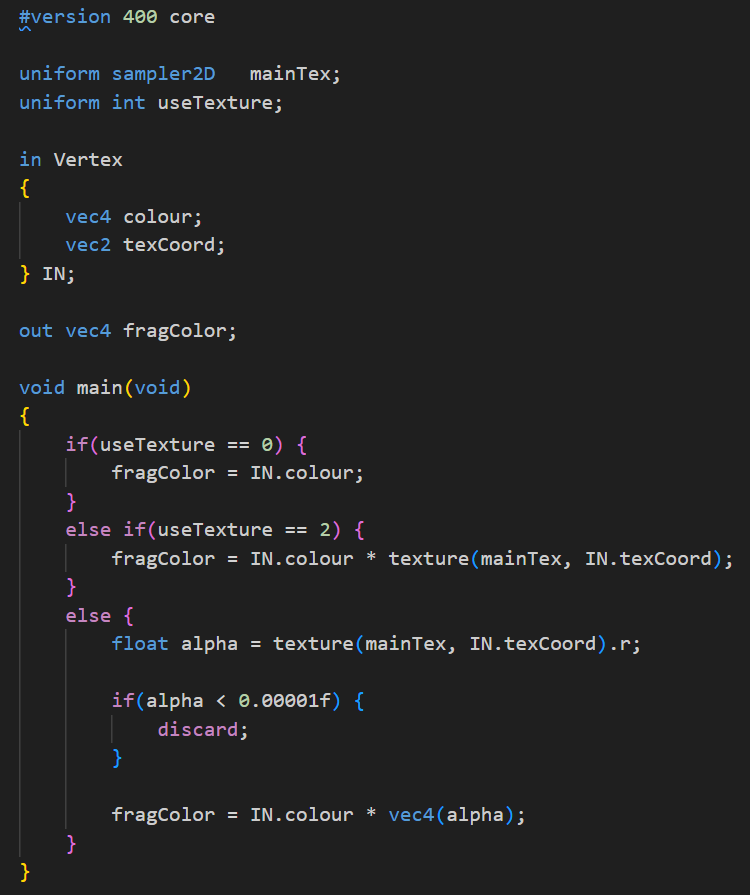
I made a small adjustment to the shader to output the color and texCoord as a Vertex struct.
The rest of the shader code was already set up to handle the .fnt bitmap font rendering process, so it worked seamlessly with the new FreeType-based approach.
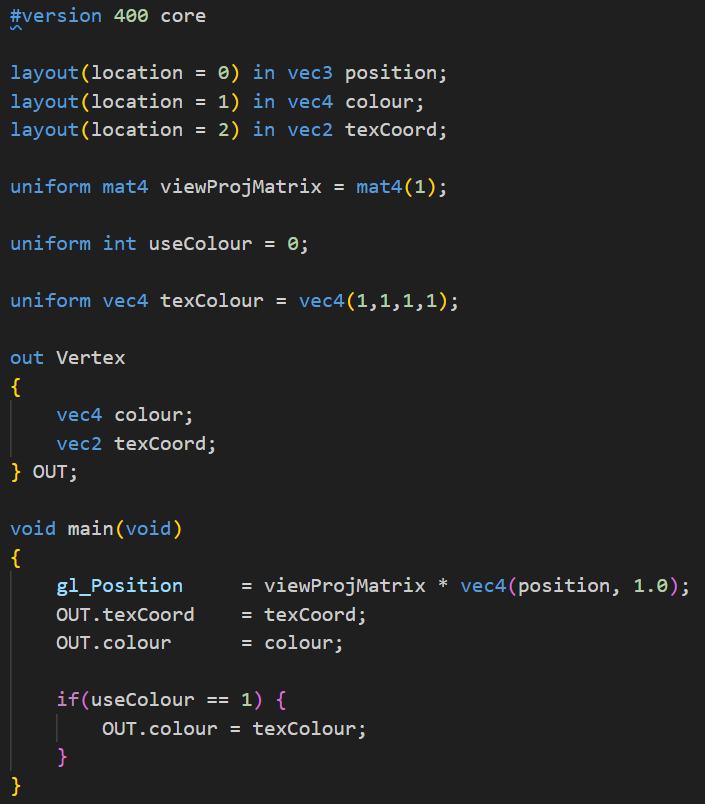
Since the color and positions were now passed as a Vertex struct from Debug.vert, the Debug.frag shader needed to receive this struct. It would then use the data to render the text correctly, applying the color and texture coordinates to each character.
That wraps up font rendering!
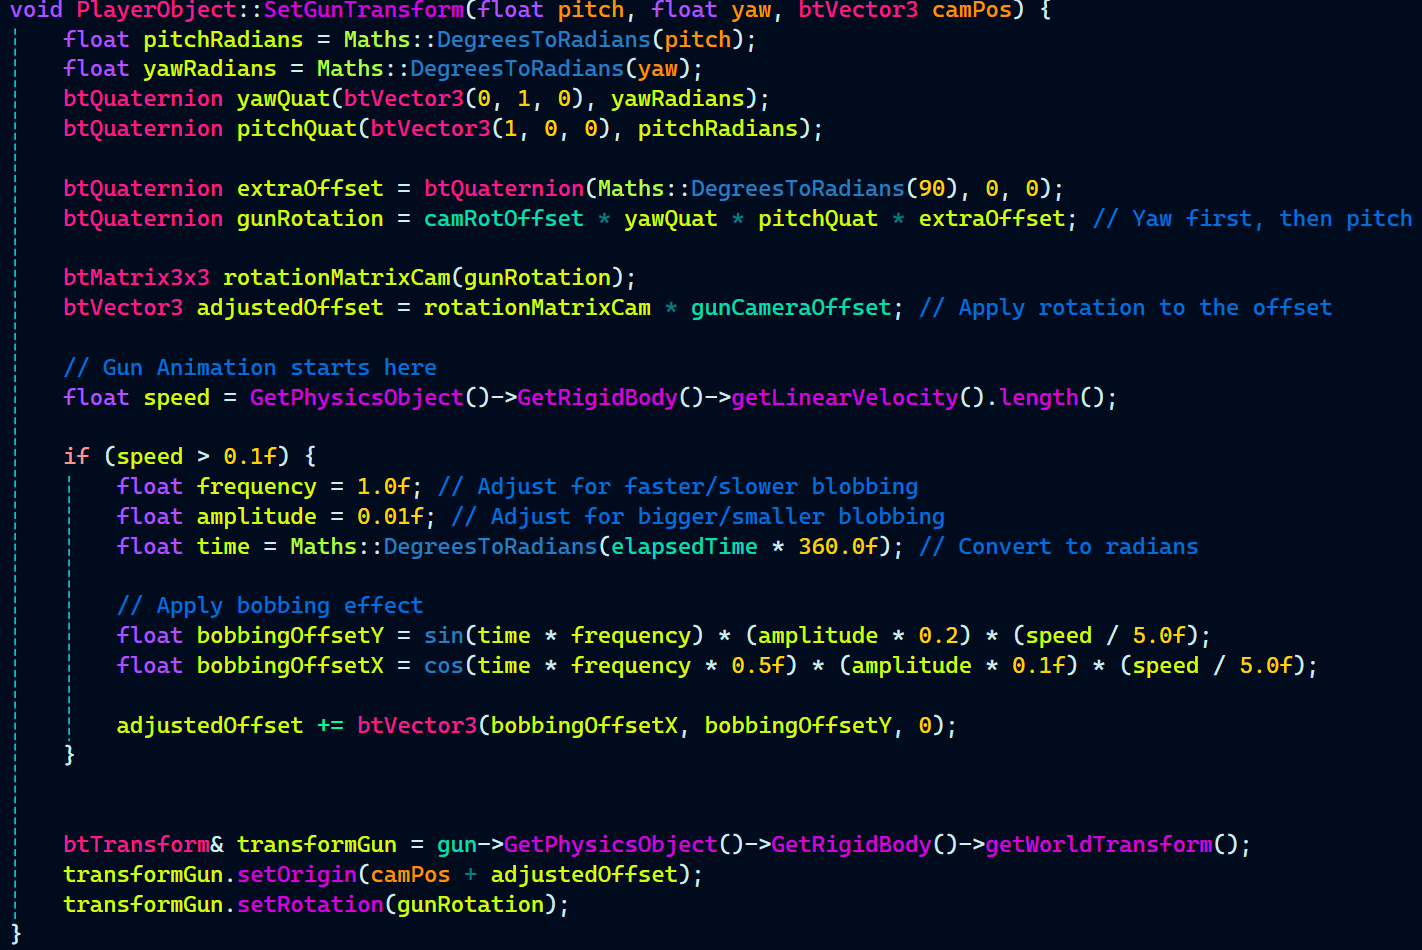
Gun Animations
Gun animation simply uses the typically method of using a sin wave to animate the gun as done in many FPS games.
Gun animation simply uses the typical method of using a sine wave to animate the gun, as seen in many FPS games. The way it’s implemented is by first calculating the gun’s rotation based on the camera’s pitch and yaw angles, applying the necessary rotations in the correct order (yaw first, then pitch). Then, an additional offset is applied to the rotation to give the gun a more natural look.
Next, the speed of the player’s movement is used to determine the intensity of the gun’s bobbing animation. If the player is moving fast enough (speed > 0.1f), the function calculates the bobbing effect based on a sine and cosine wave, adjusting the vertical and horizontal offsets of the gun. This results in the gun moving in sync with the player’s movement, giving it a more immersive feel.
The final step involves applying the calculated offset to the gun’s position and updating its world transform to reflect the new position and rotation.
Note: Only the code related to the gun animation is mine, rest of the code related to how the gun moves or rotates along with the player is written by the gameplay programmer Alex Barnett.